 张雪随笔
6.maven
- 官网:https://maven.apache.org/
- 官方文档:https://maven.apache.org/plugins/index.html
- 仓库:
- 阿里云仓库:https://developer.aliyun.com/mvn/guide
- Maven官方仓库:https://mvnrepository.com/
1.基础
Maven是Java项目管理工具,帮助开发人员自动构建、管理项目依赖关系等。 Maven基于XML定义项目结构和构建过程,提供标准的构建生命周期和插件来执行各种构建任务。 Maven还能够自动下载和管理项目的依赖库,并能够生成各种报告,如测试报告、代码覆盖率报告等。
1.1.POM
POM 代表项目对象模型,它是一个 XML 文件,保存在项目根目录的 pom.xml文件中,以下是一个项目的依赖,被称为项目的坐标
<dependency>
    <groupId>junit</groupId>
    <artifactId>junit</artifactId>
    <version>4.12</version>
    <scope>test</scope>
    <optional>true</optional>
    <systemPath>${basedir}/lib/junit-4.12.jar</systemPath>
    <exclusions>
        <exclusion>
            <artifactId>log4j-to-slf4j</artifactId>
            <groupId>org.apache.logging.log4j</groupId>
        </exclusion>
    </exclusions>
</dependency>
- groupId:【必填】项目组 Id,必须全球唯一
- artifactId:【必填】项目 Id,即项目名
- version:【必填】项目版本
- scope:依赖范围
- compile:编译依赖范围。默认的范围,可以不填,表示在所有过程中都有效,如编译期、测试过程中、运行期间等。
- provided: 已提供依赖范围。这个范围表示只提供编译和测试阶段有效,运行期间不需要,像tomcat等容器本身已经提供的servlet-api等。
- runtime: 运行时依赖范围。这个范围表示只有在运行和测试期间才有效,编译期间不需要,像连接数据库的jdbc驱动程序等。
- test: 测试依赖范围。这个范围只有测试阶段有效,编译和运行不需要,像单元测试提供的junit包。
- system: 系统依赖范围。这个范围表示不依赖本地仓库,jar在其他的目录,需要通过systemPath指定路径,这个不建议使用。
- import: 引用依赖范围。Maven2.0.9之后新增的范围,只能用在
中,并且导入的type为pom类型的父工程配置,一般用来解决多继承问题。
- optional:表示该依赖是可选的.不会被依赖传递,减少jar包冲突。
<optional>true</optional> - systemPath:配合scope=system使用,表示引用本地目录下的jar。
- exclusions:剔除这个项目中的某个依赖。用于降低引入额外功能以及解决依赖冲突。
- type:被引入的项目类型,比如:jar、war、pom、maven-plugin等,默认可以不填写。
1.2.生命周期
Maven有三套相互独立的生命周期,请注意这里说的是"三套",而且"相互独立",初学者容易将Maven的生命周期看成一个整体。
这三套生命周期分别是:
- Clean Lifecycle 在进行真正的构建之前进行一些清理工作。比如,mvn clean: 构建输出的清理
- Default Lifecycle 构建的核心部分,编译,测试,打包,部署等等。比如,mvn install : 编译 、 测试 、 打包 、 安装,这就是一套默认的构建生命周期
- Site Lifecycle 生成项目报告,站点,发布站点。比如,比如,mvn site
它们是相互独立的,你可以仅仅调用clean来清理工作目录,仅仅调用site来生成站点。 当然你也可以直接运行 mvn clean install site 运行所有这三套生命周期。
实际上我们经常一起使用,比如:mvn clean deploy -Dmaven.test.skip=true -P dev
maven的所有phases:validate –> compile –> test –> package –> verify –> install –> deploy
1.3.常用命令
- clean: 清除目标目录中的生成结果。
- compile: 编译源代码
- test: 运行项目中的单元测试
- package: 根据项目生成jar文件
- install: 编译打包,并在本地库中安装jar
- deploy,发布。指的是将打包的结果发布到maven仓库。
- -DskipTests,不执行测试用例,但编译测试用例类生成相应的class文件至target/test-classes下。
- -Dmaven.test.skip=true,不执行测试用例,也不编译测试用例类。
- dependency:sources 下载项目依赖的jar包的源码包
- dependency:tree 查看依赖树,根据依赖原则来调整依赖在 POM文件的声明顺序。
- generate-sources:开发环境与代码分离,很少使用,执行这个命令可以通过查看.classpath和.project两个文件来查看变化。
- tomcat*:run: 启动tomcat,前提是在项目的pom.xml文件中添加了tomcat插件
- eclipse:eclipse: 生成Eclipse项目文件,即.classpath和.project文件
- -U 参数强制 maven 下载最新的快照构建
1.4.属性
1. 内置属性:maven共有6个内置属性,maven预定义,用户可以直接使用的
${basedir}            表示项目的根目录,pom.xml所在的目录(可以是项目根目录或者module的目录);默认为 D://workspace/springboot-demo/
${version}            表示项目版本;例如 0.0.1-SNAPSHOT
${project.basedir}    同${basedir};默认为 D://workspace/springboot-demo/
${project.baseUri}    表示项目文件地址,当前项目下<url>种的内容
${maven.build.timestamp}          表示项目构建时间;
${maven.build.timestamp.format}   表示属性${maven.build.timestamp}的展示格式,默认值为yyyyMMdd-HHmm,

可自定义格式,其类型可参考java.text.SimpleDateFormt。用法如下:
<properties>
<maven.build.timestamp.format>yyyy-MM-dd HH:mm:ss</maven.build.timestamp.format>
</properties>

2.POM属性:使用pom属性可以引用到pom.xml文件对应的元素的值
${project.build.sourceDirectory}:     项目的主源码目录,默认为 src/main/java
${project.build.testSourceDirectory}: 项目的测试源码目录,默认为 src/test/java
${project.build.directory}:           项目构件输出目录,默认为 target/
${project.outputDirectory}:           项目主代码编译输出目录,默认为 target/classes/
${project.testOutputDirectory}:       项目测试代码编译输出目录,默认为 target/test-classes/
${project.groupId}:                   项目的 groupId
${project.artifactId}:                项目的 artifactId
${project.build.sourceEncoding}       表示主源码的编码格式
${project.build.sourceDirectory}      表示主源码的路径
${project.build.finalName}            表示输出文件名称;
${project.vesion}                     表示项目版本,与${version}相同

3. 环境变量:所有环境变量都可以使用以env开头的Maven属性引用,使用mvn help:system命令可查看所有环境变量
${env.JAVA_HOME}    表示JAVA_HOME环境变量的值;

4. Settings属性:与pom属性同理,用户可以用以settings.开头的属性引用setting.xml文件的XML元素值
${settings.localRepository}       表示本地仓库的地址

5.自定义属性:在pom.xml文件的<properties>标签下定义的maven属性
<properties>
    <my.pro>proname</my.pro>
</properties>
1.5.替代产品
- maven daemon。就是mvnd,主要解决maven编译效率低的问题。大约提升3~5倍的效率。
2.安装与设置
2.1.安装
选择二进制安装包,解压到英文目录即可:https://maven.apache.org/download.cgi
下面设置为可选项
1. 配置环境变量
MAVEN_HOME D:\\java\\apache-maven-3.6.3
将%MAVEN_HOME%\\bin加入Path中,一定要注意,windows加分号;,Linux 加冒号 :
验证安装结果:cmd 中输入 mvn -v

2. 设置内存:使用maven的时候,可能遇到内存溢出,修改 apache-maven-3.6.3\\bin\\mvn.bat
在@REM set MAVEN_OPTS=……下一行,插入下面配置
set MAVEN_OPTS= -Xms128m -Xmx512m

3. 设置JAVA_HOME
修改mvn.bat文件,找到下面2行

@REM ==== START VALIDATION ====
if not "%JAVA_HOME%" == "" goto OkJHome

在这两行上面写
set JAVA_HOME=D:\\java\jdk1.6
2.2.设置settings.xml
apache-maven-3.6.3/conf/settions.xml是全局的,默认将依赖下载到 ~/.m2/repository 目录下。 通常情况我们会修改本地仓库到maven安装目录下:修改全局setting.xml文件, 找到localRepository标签,默认为注释掉的,在该注释段之外添加
<localRepository>D://java//apache-maven-3.6.3//repository</localRepository>
2.3.修改仓库
我们下载资源的地址。默认为maven官方,网速不太好,国内一般选择使用阿里的公共仓库
方式1:在pom.xml中配置
<repositories>
    <repository>
        <releases>
            <enabled>true</enabled>
        </releases>
        <snapshots>
            <enabled>true</enabled>
        </snapshots>
        <id>aliyun-central</id>
        <name>aliyun-central</name>
        <url>https://maven.aliyun.com/repository/central</url>
    </repository>
</repositories>

方式2:打开 maven 的配置文件(conf/settings.xml)
<mirror>
    <id>aliyunmaven</id>
    <name>aliyun-central</name>
    <url>https://maven.aliyun.com/repository/central</url>
    <mirrorOf>*</mirrorOf>
</mirror>
虽然可以设置仓库的地方很多,但是我们通常修改一个地方即可,没有必要把所有的位置都修改一遍。
最佳实践:有两种,适用不同的场景
- 在项目的根pom中使用project.repositories.repository进行配置。适用与不会频繁新增项目的场景,一般使用这种方式即可
- 修改maven的sttings.xml,settings.mirrors.mirror进行配置。
2.4.Nexus私服
Nexus 是Maven 仓库管理器,管理开发所需要的构件。如果每次都是从 Apache 提供的 Maven中央仓库去下载所需要的构件,那么这通常不是一个好的做法。 应该在本地架设一个Maven仓库服务器,再代理远程仓库的同时维护本地仓库,以节省带宽和时间,那么Nexus可以满足这样的需求。
并且,我们有的时候需要发布一些公司内部的公共jar包,保证代码的安全性,所以我们也需要私仓库。 安装教程:
- https://blog.csdn.net/weixin_47968414/article/details/124426643
- https://blog.csdn.net/qq_43891456/article/details/107690889
发布需要账号密码,可以配置到settings文件中
<servers>
  <server>
    <id>deploymentRepo</id>
    <username>repouser</username>
    <password>repopwd</password>
  </server>
</servers>

<mirrors>
  <mirror>
    <id>deploymentRepo</id>
    <name>oneof the central mirrors in china</name>
    <url>http://maven.net.cn/content/groups/public/</url>
    <mirrorOf>central</mirrorOf>
  </mirror>
</mirrors>
3.使用技巧
3.1.仓库搜索优先级
仓库类型Maven仓库主要分为三种类型:
- 本地仓库:位于开发者本机的仓库,默认位置为~/.m2/repository
- 远程仓库:通过网络访问的仓库,包括:
- 中央仓库:Maven社区提供的公共仓库
- 私服:团队或组织内部的私有仓库
- 第三方仓库:其他组织维护的公共仓库
仓库优先级与查找顺序:
- 本地仓库:永远是第一查找目标。如果本地仓库中已存在所需版本的构件,Maven 会直接使用它(除非是 SNAPSHOT 版本且配置了更新策略)。
- 远程仓库 (如果本地未找到):Maven 会按照一个"有效仓库列表"来查找。这个列表的构建和优先级受以下因素影响:
远程仓库优先级
- Mirrors (settings.xml 中的
):镜像配置具有最高优先级,它可以覆盖 pom.xml 或 settings.xml 中 profile 定义的任何仓库。多个镜像依次查找。 - Profiles (settings.xml 中的
):settings.xml 中的激活的 profile 内定义的仓库。 - pom.xml 中直接定义的仓库:
和 标签内直接定义的仓库。 - Super POM / 中央仓库:如果以上都没有定义,或者都没有找到构件(且没有被镜像覆盖),就使用默认的中央仓库 (https://repo.maven.apache.org/maven2/)。
Mirrors定义规则:
1. mirrorOf 的值
  * : 匹配所有远程仓库 (最常用,如指向公司内部的 Nexus/Artifactory )。
  central: 仅镜像中央仓库
  external:* : 匹配所有远程仓库,除了本地文件系统 (file://) 和 localhost 定义的仓库。
  repo1,repo2: 匹配 id 为 repo1 或 repo2 的仓库。
  *,!repo1: 匹配所有仓库,除了 id 为 repo1 的仓库。
3.2.依赖原则
1. 依赖路径最短优先原则
A -> B -> C -> X(1.0)
A -> D -> X(2.0)
由于 X(2.0) 路径最短,所以使用 X(2.0)。

2. 声明顺序优先原则
A -> B -> X(1.0)
A -> C -> X(2.0)
在 POM 中最先声明的优先,上面的两个依赖如果先声明 B,那么最后使用X(1.0)。

3. 覆写优先原则
子 POM 内声明的依赖优先于父 POM 中声明的依赖。
3.3.依赖分析
- 使用命令:mvn dependency:tree,找到 Maven 加载的 Jar 包版本,同时展示了冲突的详情
- 使用命令:mvn dependency:list,展示所有的依赖,不显示冲突情况
- 使用命令:mvn dependency:analyze,分析maveny依赖关系。
- Used undeclared dependencies:已经使用了但是未定义的依赖。此类依赖一般是由依赖传递机制引入进来,不是直接引入的,并且在代码中直接使用了。
- Unused declared dependencies:未使用但引入的依赖。此类依赖并未直接在代码中使用,也不代表运行期间没有使用。仅作为删除未使用的依赖的一项参考。
- mvn dependency:analyze-duplicate, pom里使用不规范,版本没有指定、是否有重复的依赖等等
- loosejar:运行时依赖检查工具,采用javaagent的方式,通过classloader加载class,统计class以及jar使用情况。
- 使用idea插件: maven helper, 展示列表和树, 与eclipse的显示效果一样,非常好用。
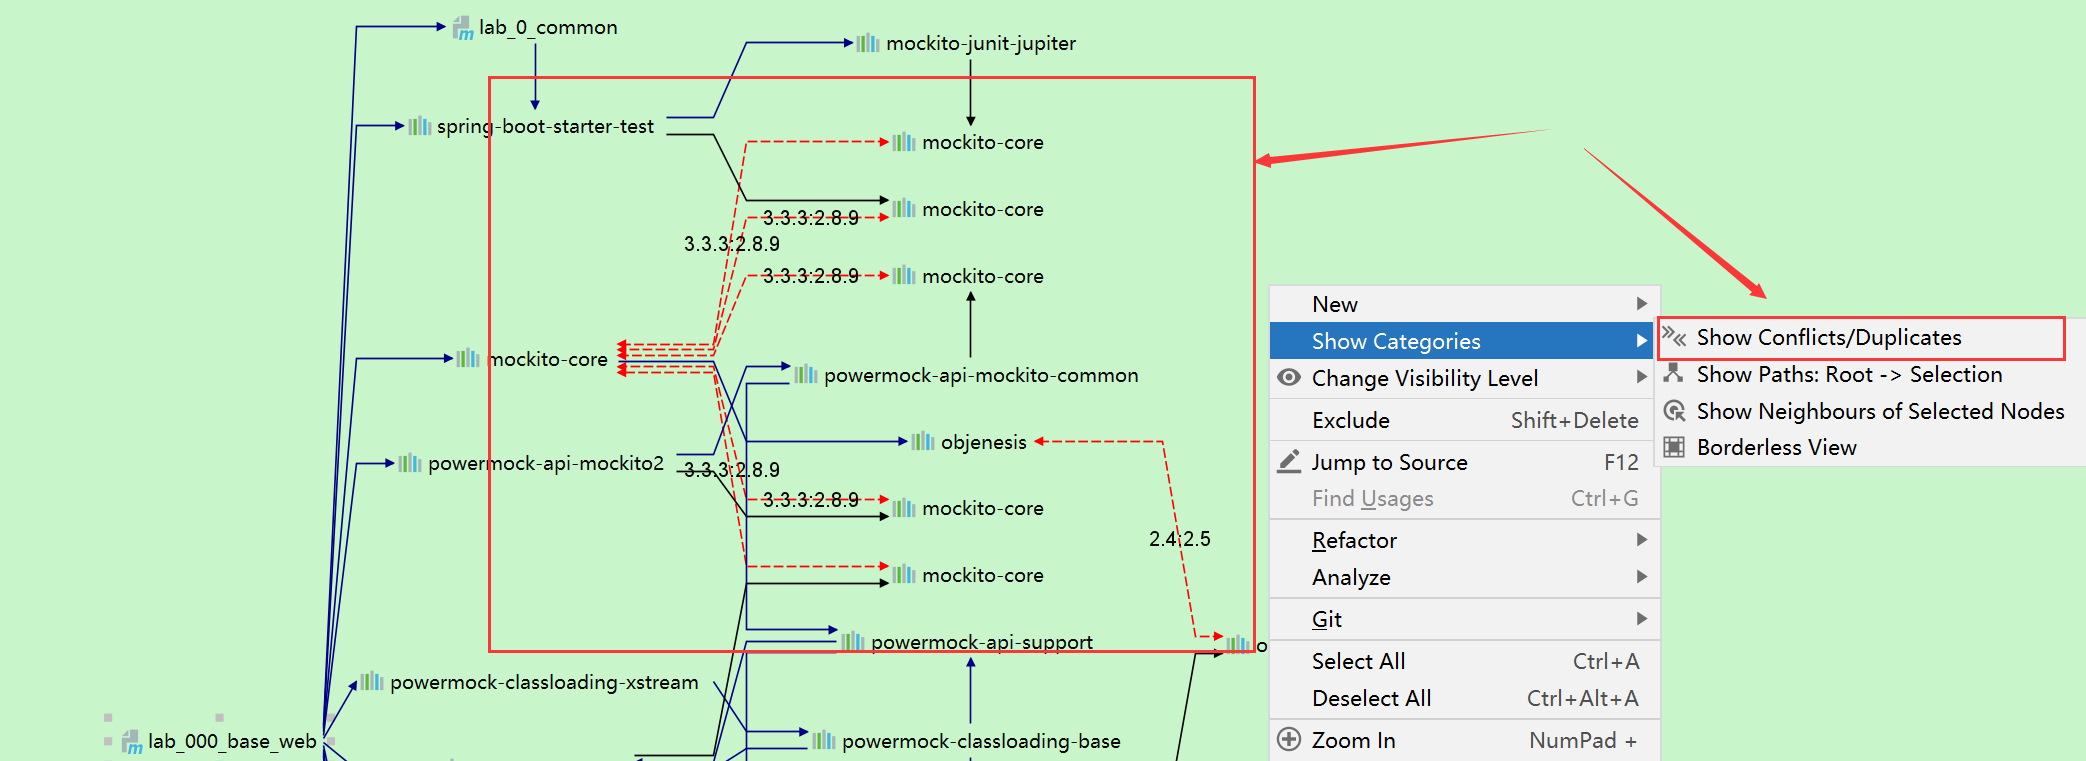
- idea 自带工具。如下图,可以以图的形式展示依赖树,以及冲突
3.4.快照与版本
快照是一种特殊的版本,指定了某个当前的开发进度的副本。
- 对于版本,如果 Maven 以前下载过指定的版本文件,比如说 1.0,Maven 将不会再从仓库下载新的可用的1.0 文件。若要下载更新的代码必须版本升到1.1。
- 对于快照,Maven 每次构建都会在远程仓库中检查新的快照,每次编译都会从仓库下载最新的仓库。版本相同,对比的是时间戳
快照使用方式:就是在版本号后面增加-SNAPSHOT。
仓库配置更新策略
- SNAPSHOT 更新: 对于 SNAPSHOT 版本的构件,Maven 会根据仓库配置中的
(如 always, daily, interval:X, never) 来决定是否检查远程仓库是否有更新版本,即使本地已存在。 - Release 更新: 对于 Release 版本的构件,一旦下载到本地仓库,Maven 默认不会再次检查远程仓库。除非编译时使用-f 强制更新
<profiles>
    <profile>
      <id>allow-snapshots</id>
      <repositories>
        <repository>
          <id>central-snapshots</id>
          <url>http://some.snapshot.repo/snapshots</url>
          <releases><enabled>false</enabled></releases><!-- 默认不更新 -->
          <snapshots><enabled>true</enabled></snapshots><!-- 默认更新 -->
        </repository>
      </repositories>
    </profile>
</profiles>

<activeProfiles>
    <activeProfile>allow-snapshots</activeProfile>
</activeProfiles>
3.5.认证
如果远程仓库需要认证(deploy jar到仓库),需要在 settings.xml 的
<servers>
    <server>
      <id>nexus-repo</id><!-- 与mirror的id或repository的id匹配 -->
      <username>myuser</username>
      <password>mypassword</password>
    </server>
</servers>

<profiles>
    <profile>
      <repositories>
        <repository>
          <id>nexus-repo</id>
          <url>http://some.snapshot.repo/snapshots</url>
        </repository>
      </repositories>
    </profile>
</profiles>
3.5.effective pom
maven的继承原则:无论 POM 文件中是否显示的声明,所有的 POM 均继承自一个父 POM,这个父 POM 被称为 Super POM。 在pom的继承关系中,子pom可以覆盖父pom中的配置;如果子pom没有覆盖,那么父pom中的配置将会被继承。
按照这个规则,继承关系中的所有pom叠加到一起,就生成一个最终生效的effective pom。
查看effective pom: mvn help:effective-pom {可选参数可以查看依赖的来源,-Dverbose}
查看effective pom,可以方便了解,完整的pom执行的内容,确认插件、仓库、依赖是否生效,以及生效的版本等。
4.插件
官方提供的插件https://maven.apache.org/plugins/index.html
以下为常用组件:
- maven-compiler-plugin:编绎阶段设置一些参数
- maven-surefire-plugin:用于测试阶段的插件。显式声明是否跳过测试。
- maven-failsafe-plugin:用作集成测试的配置,安全的失败插件
- maven-checkstyle-plugin:可以帮助开发检测代码中不合规范的地方。
- build-helper-maven-plugin:支持多个source/test/resource。
- spring-boot-maven-plugin:可以帮助项目打包成一个fat jar。
- jacoco-maven-plugin:生成单元测试覆盖率报告。
- sonar-maven-plugin:使用该插件执行sonar扫描。
- maven-javadoc-plugin:生成Java api 文档。
- maven-source-plugin:生成java源码包的插件。
- maven-jar-plugin:maven:打包为一个可以执行的jar,主要用来打包成fat jar。
- maven-assembly-plugin: 支持定制化打包方式,将编译后的打包结果再处理一次。 可以用于打包成fat Jar或者将制品打包为成品。
- maven-antrun-plugin: 用于在Maven构建过程中执行Ant任务。通常用于对文件进行一系列操作.maven-antrun-plugin详解
- maven-shade-plugin 用来打可执行包,executable(fat) jar
- exec-maven-plugin: 执行系统命令,辅助maven编译打包过程
- maven-dependency-plugin: 处理maven依赖相关的插件,例如:分析依赖,获得依赖,复制依赖,解压依赖等十几种功能
4.1.maven-compiler-plugin
设置编译阶段的参数
<plugin>
    <!-- 一般而言,target与source是保持一致的,但是,有时候为了让程序能在其他版本的jdk中运行(对于低版本目标jdk,源代码中不能使用低版本jdk中不支持的语法),会存在target不同于source的情况 -->
    <groupId>org.apache.maven.plugins</groupId>
    <artifactId>maven-compiler-plugin</artifactId>
    <configuration>
        <!--场景1:指定maven编译的jdk版本,如果不指定,maven3默认用jdk 1.5 maven2默认用jdk1.3 -->
        <source>${java.version}</source><!-- 源代码使用的JDK版本 -->
        <target>${java.version}</target><!-- 需要生成的目标class文件的编译版本 -->
        <encoding>${project.build.sourceEncoding}</encoding><!-- 指定项目编码-->
        <verbose>true</verbose><!--编译过程显示详情-->
        <showWarnings>true</showWarnings><!--显示警告-->
        <fork>true</fork><!-- 要使compilerVersion标签生效,还需要将fork设为true,用于明确表示编译版本配置的可用 -->
        <executable><!-- path-to-javac --></executable><!-- 使用指定的javac命令,例如:<executable>${JAVA_1_4_HOME}/bin/javac</executable> -->
        <compilerVersion>1.3</compilerVersion><!-- 指定插件将使用的编译器的版本 -->
        <meminitial>128m</meminitial><!-- 编译器使用的初始内存 -->
        <maxmem>512m</maxmem><!-- 编译器使用的最大内存 -->
        <!--场景3:设置插入式注解处理器的路径,因为默认情况下 mapstruct 和 lombok不能 同时使用,会有一个失效,所以需要手动添加-->
        <annotationProcessorPaths>
            <!--3.1: mapstruct 注解处理器-->
            <path>
                <groupId>org.mapstruct</groupId>
                <artifactId>mapstruct-processor</artifactId>
                <version>1.5.2.Final</version>
            </path>
            <!--3.2: lombok,内部包含注解处理器-->
            <path>
                <groupId>org.projectlombok</groupId>
                <artifactId>lombok</artifactId>
                <version>1.18.22</version>
            </path>
            <!--3.3: lombok 与 mapstruct 绑定器,可以配合一起使用-->
            <path>
                <groupId>org.projectlombok</groupId>
                <artifactId>lombok-mapstruct-binding</artifactId>
                <version>0.2.0</version>
            </path>
            <!--3.4: 生成JPA的 Metamodel-->
            <path>
                <groupId>org.hibernate</groupId>
                <artifactId>hibernate-jpamodelgen</artifactId>
                <version>5.4.3.Final</version>
            </path>
        </annotationProcessorPaths>
        <!-- 场景4:设置JVM参数名编译参数,用来传递编译器自身不包含但是却支持的参数选项 -->
        <compilerArgument>-parameters</compilerArgument>
        <!--设置jvm参数-->
        <compilerArguments>
            <verbose/>
        </compilerArguments>
    </configuration>
</plugin>
4.2.maven-surefire-plugin
与DskipTests命令作用一致
<plugin>
    <groupId>org.apache.maven.plugins</groupId>
    <artifactId>maven-surefire-plugin</artifactId>
    <version>3.0.0-M7</version>
    <configuration>
        <skipTests>true</skipTests>
    </configuration>
</plugin>
4.3.maven-failsafe-plugin
失败安全插件。作用在verify阶段(package之后,install之前)。 效果是:校验 verify 之前的几个阶段是否全部成功,只要有一个失败的就不会执行后面的几个阶段,
<build>
    <plugins>
        <plugin>
            <groupId>org.apache.maven.plugins</groupId>
            <artifactId>maven-failsafe-plugin</artifactId>
            <version>3.0.0-M7</version>
            <configuration>
                <!--只校验指定的几个类是否全部成功-->
                <includes>
                    <include>**/CucumberIT*.java</include>
                </includes>
            </configuration>
        </plugin>
    </plugins>
</build>
4.4.maven-checkstyle-plugin
通常设置到编译的validate节点。也可以设置到reporting中,与site进行绑定。
<build>
    <plugins>
        <plugin>
            <groupId>org.apache.maven.plugins</groupId>
            <artifactId>maven-checkstyle-plugin</artifactId>
            <version>3.2.0</version>
            <configuration>
                <configLocation>sun_checks.xml</configLocation>
            </configuration>
            <executions>
                <execution>
                    <phase>validate</phase>
                    <goals>
                        <goal>check</goal>
                    </goals>
                </execution>
            </executions>
        </plugin>
    </plugins>
</build>
4.5.jacoco-maven-plugin
Code coverage(代码覆盖率)。除了生成报告外,我们还可以加入一些rule,比如超过50%的覆盖率才算pass。 还可以在CI阶段和jenkins进行集成。
<plugin>
    <groupId>org.jacoco</groupId>
    <artifactId>jacoco-maven-plugin</artifactId>
    <version>0.8.8</version>
    <executions>
        <execution>
            <goals>
                <goal>prepare-agent</goal>
            </goals>
        </execution>
        <execution>
            <id>generate-code-coverage-report</id>
            <phase>test</phase>
            <goals>
                <goal>report</goal>
            </goals>
        </execution>
    </executions>
</plugin>
4.6.spring-boot-maven-plugin
<!--打包时,可以选择跳过打包成fat jar,直接打包成普通jar,就可以被其他项目引用并使用了-->
<plugin>
    <groupId>org.springframework.boot</groupId>
    <artifactId>spring-boot-maven-plugin</artifactId>
    <configuration>
        <mainClass>com.zx.Application</mainClass>
        <outputDirectory>${project.basedir}</outputDirectory>
        <jvmArguments>-Dfile.encoding=UTF-8</jvmArguments>
        <source>1.8</source>
        <target>1.8</target>
        <encoding>UTF-8</encoding>
        <skip>true</skip>
        <includeSystemScope>true</includeSystemScope>
    </configuration>
    <executions>
        <execution>
            <goals>
                <goal>repackage</goal>
            </goals>
        </execution>
    </executions>
</plugin>
4.7.sonar-maven-plugin
编译节点,在maven就行进行质量检测。
<plugin>
    <groupId>org.sonarsource.scanner.maven</groupId>
    <artifactId>sonar-maven-plugin</artifactId>
    <version>3.4.0.905</version>
</plugin>
4.8.javadoc 和 source
<!-- 生成javadoc文档包的插件 -->
<plugin>
    <groupId>org.apache.maven.plugins</groupId>
    <artifactId>maven-javadoc-plugin</artifactId>
    <configuration>
        <!-- 忽略生成文档中的错误,如果想看下控制台中关于生成doc错误的去掉这个参数 -->
        <!--环境变量增加:JAVA_TOOL_OPTIONS=-Dfile.encoding=UTF-8-->
        <additionalparam>-Xdoclint:none</additionalparam>
        <aggregate>true</aggregate>
        <doclint>none</doclint>
        <!-- 解决控制台乱码 -->
        <charset>UTF-8</charset>
        <encoding>UTF-8</encoding>
        <docencoding>UTF-8</docencoding>
    </configuration>
    <executions>
        <execution>
            <id>attach-javadocs</id>
            <goals>
                <goal>jar</goal>
            </goals>
        </execution>
    </executions>
</plugin>

<!-- 生成java源码包的插件 -->
<plugin>
    <groupId>org.apache.maven.plugins</groupId>
    <artifactId>maven-source-plugin</artifactId>
    <executions>
        <execution>
            <id>attach-sources</id>
            <phase>compile</phase>
            <goals>
                <goal>jar-no-fork</goal>
            </goals>
        </execution>
    </executions>
</plugin>
4.9.maven-jar-plugin
<!--编译打包:1.将项目编译为jar(fast-jar, 依赖在外部)-->
<plugin>
    <groupId>org.apache.maven.plugins</groupId>
    <artifactId>maven-jar-plugin</artifactId>
    <version>2.6</version>
    <executions>
        <execution>
            <id>make-a-jar</id>
            <phase>compile</phase>
            <goals>
                <goal>jar</goal>
            </goals>
        </execution>
    </executions>
    <configuration>
        <archive>
            <addMavenDescriptor>false</addMavenDescriptor>
            <!--编写MANIFEST.MF文件-->
            <manifest>
                <!--添加classpath-->
                <addClasspath>true</addClasspath>
                <!-- 设置依赖的路径前缀 -->
                <classpathPrefix>../lib/</classpathPrefix>
                <!--用来指定启动main函数入口类路径-->
                <mainClass>com.zx.maven.Application</mainClass>
            </manifest>
        </archive>
        <!--打包排除项: 排除主jar包中配置等一些列后缀文件,因为我们要包这些配置文件放到主包外面-->
        <excludes>
            <exclude>**/*.yml</exclude>
            <exclude>**/*.properties</exclude>
            <exclude>**/*.xml</exclude>
            <exclude>**/*.sh</exclude>
        </excludes>
    </configuration>
</plugin>
4.10.maven-assembly-plugin
Assembly 插件的主要作用是,允许用户将项目输出与它的依赖项、模块、站点文档、和其他文件一起组装成一个可分发的归档文件。说白了就是:结构定制化的打包。 我们经常在GitHub上面看到tag和release等中的各种压缩包,就是可以使用该插件实现。
<plugin>
    <groupId>org.apache.maven.plugins</groupId>
    <artifactId>maven-assembly-plugin</artifactId>
    <version>2.4</version>
    <configuration>
        <!--用来指定assembly插件对应的assembly.xml配置文件-->
        <descriptors>
            <descriptor>${project.basedir}/assembly.xml</descriptor>
        </descriptors>
        <!-- 打包编码 -->
        <encoding>UTF-8</encoding>
    </configuration>
    <executions>
        <execution>
            <id>make-assembly</id>
            <!-- 绑定到package命令的生命周期上 -->
            <phase>package</phase>
            <goals>
                <!-- 只运行一次 -->
                <goal>single</goal>
            </goals>
        </execution>
    </executions>
</plugin>
4.11.maven-antrun-plugin
<plugin>
  <groupId>org.apache.maven.plugins</groupId>
  <artifactId>maven-antrun-plugin</artifactId>
  <version>1.8</version>
  <executions>
      <!--任务1:删除旧的bin目录下旧的jar-->
      <execution>
          <id>delete-jars</id>
          <phase>clean</phase>
          <goals>
              <goal>run</goal>
          </goals>
          <configuration>
              <target>
                  <!--创建目录-->
                  <mkdir dir="../deploy/"/>
                  <delete>
                      <fileset dir="../deploy/" includes="*"/>
                  </delete>
              </target>
          </configuration>
      </execution>
      <!--任务2:将新编译好的jar移动到bin目录-->
      <execution>
          <id>mvn-jars</id>
          <phase>package</phase>
          <goals>
              <goal>run</goal>
          </goals>
          <configuration>
              <target>
                  <!--创建目录-->
                  <mkdir dir="../deploy/"/>
                  <!--复制jar -->
                  <copy todir="../deploy/">
                      <fileset dir="${project.build.directory}">
                          <include
                                  name="${project.artifactId}-${project.version}.jar"/>
                      </fileset>
                  </copy>
                  <!--复制文档-->
                  <copy todir="../deploy/">
                      <fileset dir="../">
                          <include name="README.md"/>
                      </fileset>
                  </copy>
              </target>
          </configuration>
      </execution>
  </executions>
</plugin>
4.12.maven-shade-plugin
maven-plugin-shade 详解 作用是将整个项目(包含它的依赖)都打包到一个 "uber-jar" 中,例如java agent。
- uber-jar是什么:uber-jar 也叫做 fat-jar 或者 jar-with-dependencies,意思就是包含依赖的 jar。
- shade是什么:意为遮挡,在此处可以理解为对依赖的 jar 包的重定向(主要通过重命名的方式)。 ```xml
maven-assembly-plugin 也能实现相同的功能。例如:
```xml
<plugin>
    <groupId>org.apache.maven.plugins</groupId>
    <artifactId>maven-assembly-plugin</artifactId>
    <version>2.4.1</version>
    <configuration>
        <!-- get all project dependencies -->
        <descriptorRefs>
            <descriptorRef>jar-with-dependencies</descriptorRef>
        </descriptorRefs>
        <!-- MainClass in mainfest make a executable jar -->
        <archive>
            <manifest>
                <mainClass>com.zx.maven.Application</mainClass>
            </manifest>
        </archive>
    </configuration>
    <executions>
        <!-- 配置执行器 -->
        <execution>
            <id>make-assembly</id>
            <!-- 绑定到package命令的生命周期上 -->
            <phase>package</phase>
            <goals>
                <!-- 只运行一次 -->
                <goal>single</goal>
            </goals>
        </execution>
    </executions>
</plugin>
编译时可能出现以下问题
[ERROR] Failed to execute goal org.apache.maven.plugins:maven-shade-plugin:3.0.0:shade (default) on project platform-migration: Unable to parse configuration of mojo org.apache.maven.plugins:maven-shade-plugin:3.0.0:shade for parameter resource: Cannot find 'resource' in class org.apache.maven.plugins.shade.resource.ManifestResourceTransformer -> [Help 1]
原因是父级的pom中也定义了shade。shade每次执行都具有唯一的ID,如果不定义就采用默认的,导致id冲突。我们自行定义一个id即可。
<plugins>
  <plugin>
    <groupId>org.apache.maven.plugins</groupId>
    <artifactId>maven-shade-plugin</artifactId>
    <executions>
      <execution>
        <id>shade-my-jar</id>
4.13.exec-maven-plugin
exec-maven-plugin有两个执行目标,分别是exec和java
<!-- compile阶段 更新漏洞库 -->
<plugin>
    <groupId>org.codehaus.mojo</groupId>
    <artifactId>exec-maven-plugin</artifactId>
    <version>3.0.0</version>
    <executions>
        <!-- compile阶段更新漏洞库-->
        <execution>
            <id>execute-my-command</id>
            <phase>compile</phase>
            <goals>
                <goal>exec</goal>
            </goals>
            <configuration>
                <!--当前命令执行时的工作目录-->
                <workingDirectory>${project.basedir}/dependency-check/bin/</workingDirectory>
                <!--表示执行的命令,比如上面的java表示要执行java这个命令,当然这里可以时任意的控制台命令-->
                <executable>dependency-check.bat</executable>
                <!--当前命令执行时传递的参数-->
                <arguments>
                    <argument>--updateonly</argument>
                </arguments>
            </configuration>
        </execution>
        <!--打印jdk版本-->
        <execution>
            <id>exec-jdk-version</id>
            <phase>generate-sources</phase>
            <goals>
                <goal>exec</goal>
            </goals>
            <configuration>
                <executable>java</executable>
                <arguments>
                    <argument>-version</argument>
                </arguments>
                <workingDirectory>${basedir}</workingDirectory>
            </configuration>
        </execution>
        <!--构建vue前端代码:1.安装依赖-->
        <execution>
            <id>exec-npm-run-install</id>
            <phase>generate-sources</phase>
            <goals>
                <goal>exec</goal>
            </goals>
            <configuration>
                <executable>npm</executable>
                <arguments>
                    <argument>install</argument>
                </arguments>
                <workingDirectory>${basedir}</workingDirectory>
            </configuration>
        </execution>
        <!--构建vue前端代码:2.编译项目-->
        <execution>
            <id>exec-npm-run-build</id>
            <phase>generate-sources</phase>
            <goals>
                <goal>exec</goal>
            </goals>
            <configuration>
                <executable>npm</executable>
                <arguments>
                    <argument>build</argument>
                </arguments>
                <workingDirectory>${basedir}</workingDirectory>
            </configuration>
        </execution>
    </executions>
</plugin>
4.14.maven-dependency-plugin
maven插件maven-dependency-plugin使用详解
<!-- 用于复制项目依赖到指定的目录 -->
<plugin>
    <groupId>org.apache.maven.plugins</groupId>
    <artifactId>maven-dependency-plugin</artifactId>
    <version>3.1.2</version>
    <executions>
        <execution>
            <id>copy-dependencies</id>
            <phase>package</phase>
            <goals>
                <goal>copy-dependencies</goal>
            </goals>
            <configuration>
                <outputDirectory>${project.build.directory}/lib</outputDirectory>
            </configuration>
        </execution>
    </executions>
</plugin>
4.99.自定义插件
插件的组成
<build>
    <plugins>
        <plugin>
            <groupId>org.apache.maven.plugins</groupId>
            <artifactId>maven-compiler-plugin</artifactId>
            <version>3.8.1</version>
            <configuration>
                <source>1.8</source>
                <target>1.8</target>
                <encoding>UTF-8</encoding>
            </configuration>
        </plugin>
    </plugins>
</build>
- configuration:配置定义各种参数
- executions:执行插件的配置
- phase:阶段,就是maven执行那个阶段的时候触发插件
- goal:表示一个要执行的目标。每个目标都对应一个实现了MOJO的java类。这个类就是我们自己实现的。
插件的生命周期
Maven插件的生命周期分为三个阶段:
- 初始化阶段:Maven会将插件的配置信息加载到一个org.apache.maven.plugin.Plugin对象中,这个对象中包含了插件的配置信息,如插件的id,version,dependencies等。
- 执行阶段: Maven会调用插件的execute()方法,这个方法就是插件的核心,这个方法的执行是有顺序的,先执行initialize()方法,然后执行execute()方法
- 销毁阶段: Maven会调用插件的cleanup()方法,这个方法的执行是无顺序的,先执行execute()方法,然后执行cleanup()方法。
插件执行方式
- 手动执行:在命令行中,使用mvn插件的id,如mvn compiler:compile,这个命令会先执行插件的初始化阶段,然后执行插件的执行阶段,最后执行插件的销毁阶段。
- 自动执行:在pom.xml文件中配置插件的执行,如maven-compiler-plugin,这个配置会先执行插件的初始化阶段,然后执行插件的执行阶段,最后执行插件的销销毁阶段。
5.最佳实践
5.1.版本管理
- 优雅的管理依赖
- 在父模块中使用dependencyManagement,配置依赖
- 在子模块中使用dependencies,使用依赖
- 使用profiles,进行多环境管理
- 工程内module之间关系:common->dao->server->controller
- 把groupId相同的依赖,配置在一起,同时将版本号抽取成变量,便于后续一组功能共同的版本升级
- 合理的依赖范围。以下是常见的案例
- lombok,编译时使用,编译后不再依赖,就可以将scope为provided
- 数据库驱动。通常我们会希望针对标准 JDBC 抽象进行编码,而不是直接使用MySQL driver实现,所以scope为runtime,这样我们在编程的过程中就不能引入驱动的class了。
- 单元测试相关的依赖,scope为test。
- 快速构建过程
- 尽可能复用缓存。
- 尤其是maven依赖下载占用时间最久,所以尽可能保留maven本地仓库,不要每次重构构建。
- 使用离线构建,避免依赖或插件的下载更新。mvn clean install -o
- 尽可能的并行构建或测试。默认是单线程构建,可以尝试多线程构建,maven会根据项目实际的依赖情况进行合理安排构建顺序。
- 使用4个线程进行构建: mvn -T 4 install
- 每个cpu核心使用一个线程进行构建: mvn -T 1C install
- 尽可能复用缓存。
- 如何扩展我们自己的插件
5.2.仓库管理
maven下载依赖时,先访问镜像仓库,如果镜像仓库没有,再访问远程仓库。 maven conf目录下的settings.xml文件,可以配置mirror、profile、server等信息。 设置之后,项目本地的pom中的仓库信息就无效了,也就无需添加仓库的任何信息了,做到仓库依赖的透明。
部分公司在构建项目时会指定setting文件:mvn clean install -s my-settings.xml,帮助不通的项目使用不通的的仓库。
<servers>
      <!-- 上传maven仓库的账号密码, id 对应到镜像或者仓库的id -->
      <server>
          <id>company-repo</id>
          <username>admin</username>
          <password>admin</password>
      </server>
</servers>

<!-- 镜像配置 -->
<mirrors>
  <!-- 覆盖中央仓库的镜像(阿里云) -->
  <mirror>
    <id>aliyun-central</id>
    <mirrorOf>central</mirrorOf> <!-- 关联id为central的仓库 -->
    <url>https://maven.aliyun.com/repository/central</url>
    <mirrorOf>central</mirrorOf> <!-- 只有使用中央仓库的依赖才访问该镜像 -->
  </mirror>

  <!-- 覆盖企业私有仓库的镜像(内部镜像) -->
  <mirror>
    <id>internal-mirror</id>
    <mirrorOf>company-repo</mirrorOf> <!-- 关联id为company-repo的仓库 -->
    <url>https://mirror.company.com/maven</url> <!-- 所有的请求都会转发到该镜像 -->
    <mirrorOf>*</mirrorOf>
  </mirror>
</mirrors>

<profiles>
    <!-- 设置jdk版本,maven默认1.5 -->
    <profile>
        <id>jdk</id>
        <activation>
            <activeByDefault>true</activeByDefault>
            <jdk>1.8</jdk>
        </activation>
        <properties>
            <project.build.sourceEncoding>UTF-8</project.build.sourceEncoding>
            <maven.compiler.source>1.8</maven.compiler.source>
            <maven.compiler.target>1.8</maven.compiler.target>
            <maven.compiler.compilerVersion>1.8</maven.compiler.compilerVersion>
        </properties>
    </profile>

    <profile>
        <id>nexus-pr</id>
        <!-- 公司内部远程仓库列表 -->
        <repositories>
            <repository>
                <id>nexus-byg</id>
                <name>Nexus Central</name>
                <url>https://mirror.company.com/maven</url>
                <releases><enabled>true</enabled></releases>
                <snapshots><enabled>true</enabled></snapshots>
            </repository>
        </repositories>
    </profile>

    <profile>
        <id>alimaven</id>
        <repositories>
            <repository>
                <id>alimaven</id>
                <url>http://maven.aliyun.com/nexus/content/groups/public/</url>
                <releases><enabled>true</enabled></releases>
                <snapshots><enabled>true</enabled></snapshots>
            </repository>
        </repositories>

        <!-- 插件仓库列表 -->
        <pluginRepositories>
          <pluginRepository>
                <id>alimaven</id>
                <url>http://maven.aliyun.com/nexus/content/groups/public/</url>
                <releases><enabled>true</enabled></releases>
                <snapshots><enabled>true</enabled></snapshots>
            </pluginRepository>
        </pluginRepositories>
    </profile>
</profiles>

<!-- 激活环境,让仓库生效 -->
<activeProfiles>
    <activeProfile>jdk</activeProfile>
    <activeProfile>nexus-pr</activeProfile>
    <activeProfile>alimaven</activeProfile>
</activeProfiles>
6.常见问题
was cached in the local repository, resolution will not be reattempted until the update
maven下载依赖过程可能出现问题导致下载失败。而Maven默认会使用本地缓存的库来编译工程,这样就导致无法编译了,提示无法找到依赖。
解决方案:
- 删除~/.m2/repository/对应目录或目录下的*.lastUpdated文件,然后再次运行maven命令
- maven命令后加-U,如mvn package -U。 会强制对比本地缓存与maven仓库的时间戳。
- 在repository的release或者snapshots版本中新增updatePolicy属性,其中updatePolicy可以设置为"always"、"daily" (默认)、"interval:XXX" (分钟)或"never"
<repositories>
    <repository>
      <id>io.spring.repo.maven.release</id>
      <url>http://repo.spring.io/release/</url>
      <releases>
        <enabled>true</enabled>
        <updatePolicy>always</updatePolicy>
      </releases>
    </repository>
  </repositories>
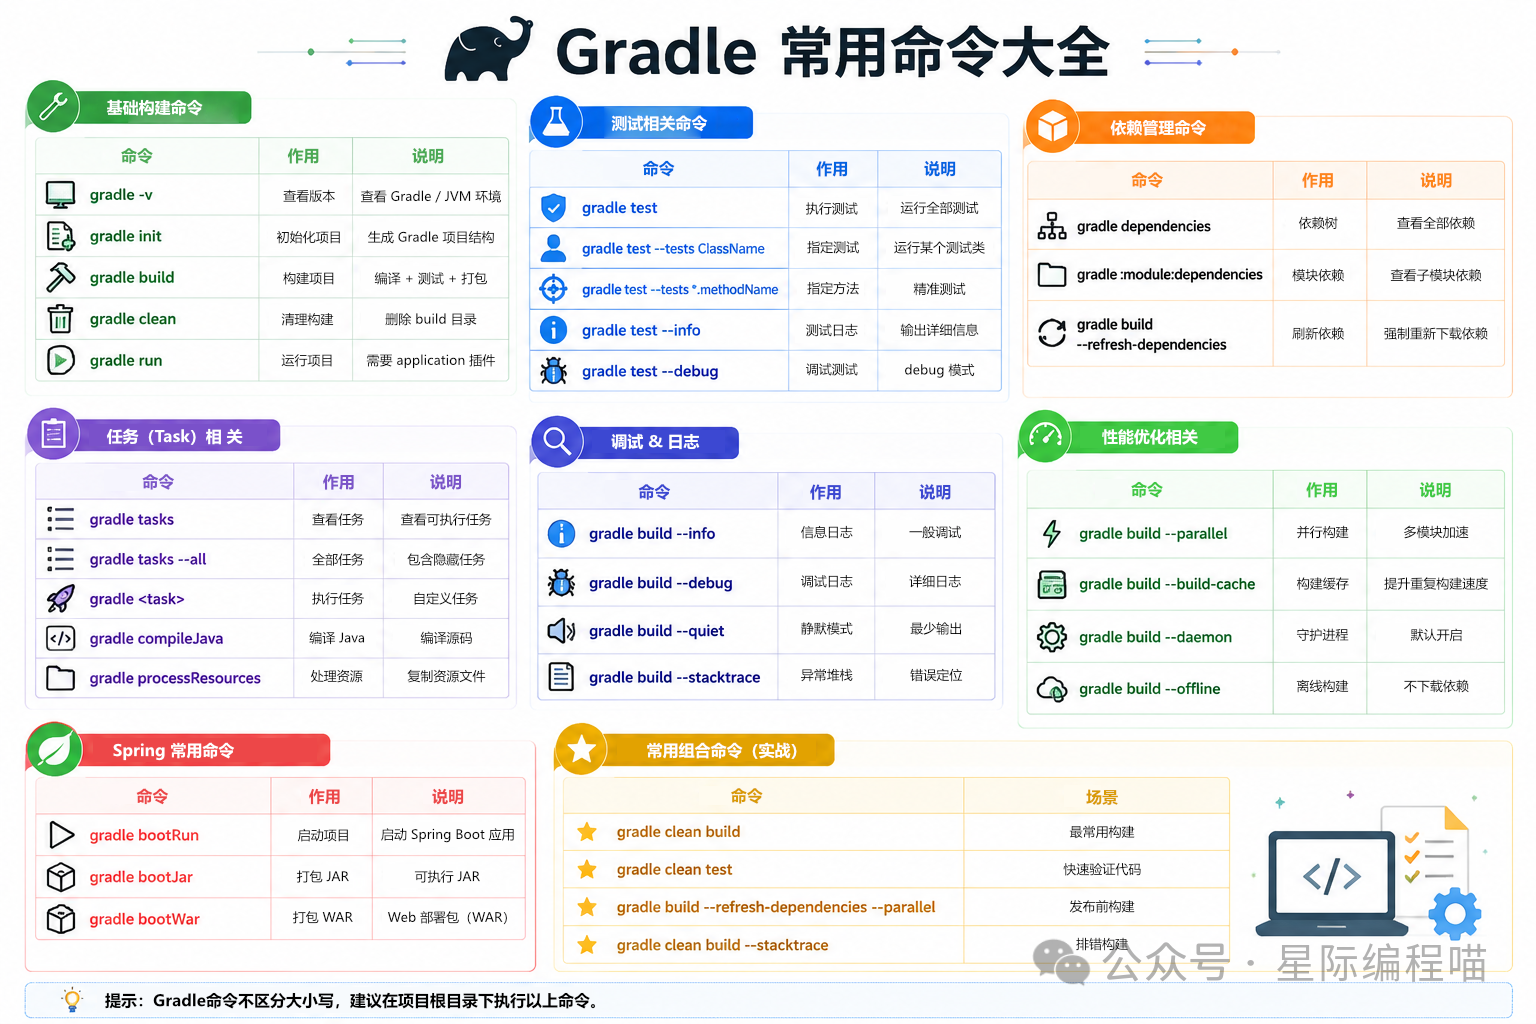
7.Gradle
gradle是一个基于Java的构建工具,它基于Groovy脚本语言,提供了更灵活的构建配置和插件机制。
编译的灵活和可编程化,即是gradle最大的优势,也是它的最大缺点。
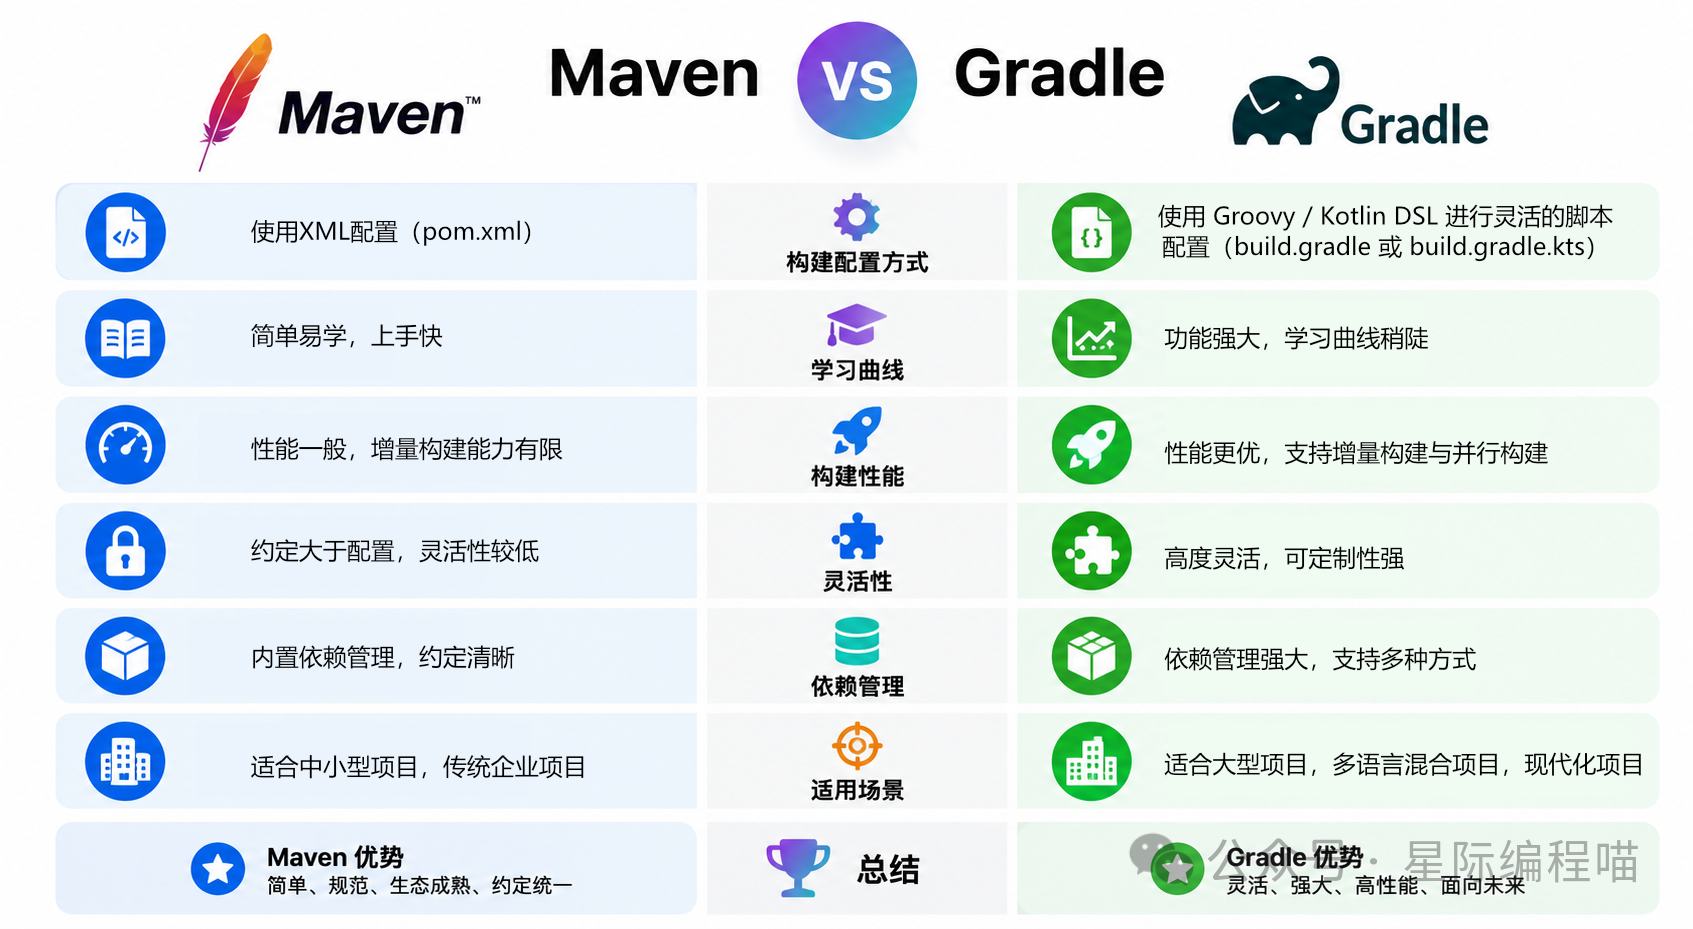
gradle对比maven
- 本文作者:zhangxue
- 本文链接:https://lucksnow1989.github.io/article/10.devOps/6.maven.html
- 版权声明:本文为本人原创文章,遵循 CC 4.0 BY-NC-SA版权协议,转载请附上原文出处链接和本声明。