 张雪随笔
Nginx
- 官网http://nginx.org/
- 中文网http://nginx.p2hp.com/
- 使用手册 https://www.w3cschool.cn/nginxsysc/
- 入门指南https://www.w3cschool.cn/nginx/
- 博客https://blog.51cto.com/liangey/category5.html
- nginx进阶使用
- Nginx开发从入门到精通
1.Nginx介绍
1.1.Nginx
- Nginx ("engine x") 是一个高性能的HTTP和反向代理服务器,也是一个IMAP/POP3/SMTP 代理服务器;
- 第一个公开版本0.1.0发布于2004年10月4日;
- 其将源代码以类BSD许可证的形式发布,因它的稳定性、丰富的功能集、示例配置文件和低系统资源的消耗而闻名;
- 官方测试nginx能够支支撑5万并发链接,并且cpu、内存等资源消耗却非常低,运行非常稳定。
一个2C44的虚拟机,一般可以支持2W左右的并发。可以代理多个小型网站。
1.2.Nginx和Apache的优缺点
nginx最大的特点是:资源消耗低,性能强、成本低。扩展性其实不算是特点,应用Apache的扩展性更强。
- nginx相对于apache的优点:
- 轻量级,比apache占用更少的内存及资源;
- 高并发,nginx 处理请求是异步非阻塞的,而apache 则是阻塞型的,在高并发下nginx能保持低资源低消耗高性能;
- 高度模块化的设计,编写模块相对简单;
- 社区活跃,各种高性能模块出品迅速啊
- apache 相对于nginx 的优点:
- nginx只适合静态和反向,Apache可以处理动态请求
- rewrite,比nginx 的rewrite 强大;
- 模块超多,基本想到的都可以找到(Tomcat是Apache的一个插件);
- 少bug ,nginx的bug相对较多;
- Nginx 配置简洁, Apache 复杂;
- Apache最大的缺点是:采用fork的方式派生子进程,一个连接对应一个进程;nginx采用epoll模型,多个连接(万级别)可以对应一个进程,资源消费非常小。
- 实际对比:Apache支撑这日均千万 PV 的网站,服务器平均负载在50~60, CPU 消耗在70%~90%;使用 Nginx 后,系统平均负载降低至1~4, CPU 使用率在20%~40%,效果可见。
1.3.大型网站系统架构
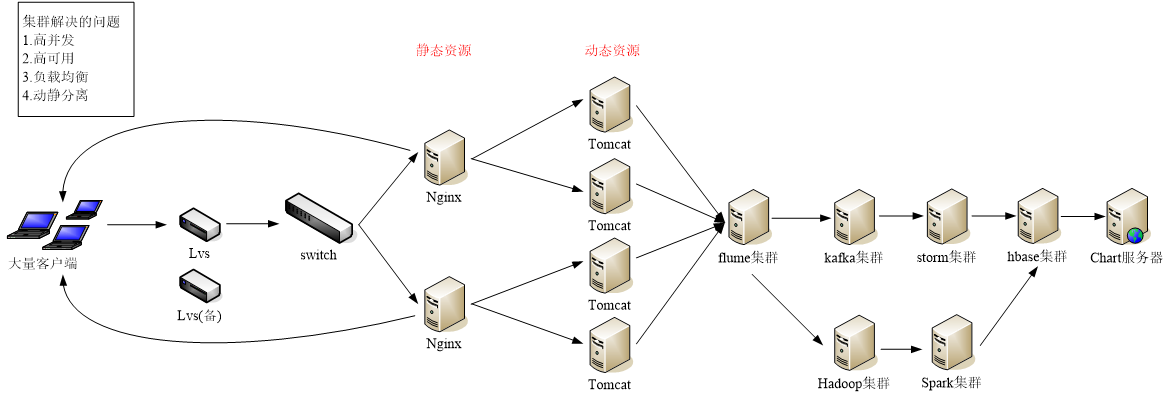
1.4.性能资源使用情况
以常见 LNMP (linux、Nginx、Mysql、PHP)为例,
- 背景:服务器在3万并发连接下,PHP部署在nginx上,且nginx开启cgi进程
- 启动状态:开启10个 Nginx 进程消耗内存:15MB*10=150MB
- 启动状态:开启64个 php-cgi进程,也就消耗20MB*64=1280MB,总共后台进程使用不到2GB内存。通常不会开启这么多
- 压测状态:Nginx+PHP的程序任然能够飞速运转,单机处理请求能力在700次/秒,那么日承受访问量在7006060*24=60,480,000=6千万,且服务器的负载不会太高。
1.5.可视化管理
- 可视化配置https://www.digitalocean.com/community/tools/nginx?global.app.lang=zhCN
- nginxWebUI:https://github.com/cym1102/nginxWebUI
- nginx-ui:https://github.com/0xJacky/nginx-ui
2.Nginx安装
1.安装Nginx依赖包
   yum install -y pcre pcre-devel
   yum install -y openssl openssl-devel

ubuntu可能需要以下:
   安装gcc g++的依赖库
   sudo apt-get install build-essential
   sudo apt-get install libtool

   安装pcre依赖库(http://www.pcre.org/)
   sudo apt-get update
   sudo apt-get install libpcre3 libpcre3-dev

   安装zlib依赖库(http://www.zlib.net)
   sudo apt-get install zlib1g-dev

   安装SSL依赖库(16.04默认已经安装了)
   sudo apt-get install openssl

2.下载源码,并解压
   wget http://nginx.org/download/nginx-1.28.0.tar.gz
   tar zxvf nginx-1.28.0.tar.gz

3.进入到解压文件下
  cd nginx-1.28.0

4.配置安装位置,(注意/usr/local/nginx是安装位置,不能使用源码的位置安装,否则一定安装失败)
  ./configure --prefix=/usr/local/nginx

  配置成功之后,会返回配置信息。我们可以记下来
  Configuration summary
      + using system PCRE library
      + using system OpenSSL library
      + using system zlib library

      nginx path prefix: "/usr/local/nginx"
      nginx binary file: "/usr/local/nginx/sbin/nginx"
      nginx modules path: "/usr/local/nginx/modules"
      nginx configuration prefix: "/usr/local/nginx/conf"
      nginx configuration file: "/usr/local/nginx/conf/nginx.conf"
      nginx pid file: "/usr/local/nginx/logs/nginx.pid"
      nginx error log file: "/usr/local/nginx/logs/error.log"
      nginx http access log file: "/usr/local/nginx/logs/access.log"
      nginx http client request body temporary files: "client_body_temp"
      nginx http proxy temporary files: "proxy_temp"
      nginx http fastcgi temporary files: "fastcgi_temp"
      nginx http uwsgi temporary files: "uwsgi_temp"
      nginx http scgi temporary files: "scgi_temp"

5.配置
   编译工程:make
   安装:make install

6.命令
   nginx [-?hvVtq] [-s][-p][-c][-g]
   -V : 显示版本和配置选项信息
   -t : 检测配置文件是否有语法错误
   -q : 在检测配置文件期间屏蔽非错误信息
   -s reload|reopen|stop|quit 重新加载配置|重启日志文件|停止|退出
   -p : 设置前缀路径
   -c : 设置配置文件
   -g : 设置配置文件外的全局指令

   测试启动:./nginx -t
   正式启动:./nginx

   重启:        ./nginx -s reload
   重新加载配置文件:        ./nginx -s reopen
   快速停止:              ./nginx -s stop
   有序停止(等待任务完成): ./nginx -s quit
   版本:                 ./nginx -v
   已安装模块:            ./nginx -V
   已安装模块(格式化):    ./nginx -V 2>&1 | sed "s/\s\+--/\n --/g"

7.检查
   ps -ef |grep nginx
   netstat -antup |grep 80

* windos使用【尽量不要使用nginx,没有什么研究的意义,没办法添加模块和重新编译】:
    start nginx 或者双击 nginx.exe,控制台没啥日志
    nginx.exe -s stop
    nginx.exe -s reload
    taskkill /f /t /im nginx.exe    kill进程
安装时可选的参数
./configure
   --prefix="安装路径" --user=安装用户 --group=安装用户组
   # 1.执行文件、配置文件、日志、进程等位置。正常默认就行,不用设置
   --sbin-path=/usr/sbin/nginx
   --conf-path=/etc/nginx/nginx.conf
   --error-log-path=/var/log/nginx/error.log
   --http-log-path=/var/log/nginx/access.log
   --pid-path=/var/run/nginx/nginx.pid
   --lock-path=/var/lock/nginx.lock
   # 2.【开启】内置的模块
   --with-http_ssl_module           # 仅支持https请求,需已经安装openssl
   --with-http_stub_status_module   # 获取nginx自上次启动以来的工作状态
   --with-http_sub_module           # 允许用一些其他文本替换nginx响应中的一些文本
   --with-http_gzip_static_module   # 在线实时压缩输出数据流
   --with-file-aio                  # 使用nginx的aio特性会大大提高性能。如果有大量的IO,有助于并发处理大量的IO和提高Nginx处理效率
   --with-threads                   # 多线程模块
   --with-http_addition_module      # 在响应之前或者响应之后追加文本内容,比如想在站点底部追加一个js或者css,可以使用这个模块来实现。
   --with-http_auth_request_module  # 认证模块
   --with-http_dav_modeule          # 使应用程可直接对webserver直接读写,并支持文件锁定及解锁,还支持文件的版本控制。启用对WebDav协议支持。
   --with-http_flv_module           # Nginx增加MP4,FLV视频支持模块
   --with-http_mp4_module           # 多媒体模块
   --with-http_gunzip_module        # 压缩模块
   --with-http_random_index_module  # Nginx显示随机首页模块,对隐藏文件不起作用。
   --with-http_realip_module        # Nginx获取真实IP模块
   --with-http_secure_link_module   # Nginx安全下载模块
   --with-http_sice_module          # Nginx中文文档
   --with-mail                      # 启用POP3/IMAP4/SMTP代理模块支持
   --with-mail_ssl_module           # 启用ngx_mail_ssl_module支持
   --with-http_v2_module            # 开启http 2.0
   --with-stream                    # 4层负载支持。ngx1.9之后的stream模块
   --with-stream_realip_module
   --with-stream_ssl_module
   --with-stream_ssl_preread_modul

   ## 3.【关闭内置模块】
   --without-select_module
   --without-poll_module          # 一般用epoll模式了,很少用这两个了吧?
   --without-dso                  # 关闭动态加载模块的功能,这是tengine特有的功能
   --without-http_charset_module  # 定义文件编码格式,不是非常明白,MS可关闭
   --without-http_gzip_module     # 这个web服务器基本上都要的,对css,js等gzip压缩用
   --without-http_ssl_module      # 要建ssl站点吗?一般不需要吧。
   --without-http_userid_module   # 在无法使用cookies的地方实现用户标识,用于链接中自动增加sessionID等,MS可关闭
   --without-http_footer_filter_module  # 在请求的响应末尾输出一段内容。输出内容可配置,并支持内嵌变量。这是tengine特有的功能
   --without-http_trim_filter_module    # 该模块用于删除 html , 内嵌 javascript 和 css 中的注释以及重复的空白符。这是tengine特有的功能
   --without-http_access_module         # 访问控制模块,一般需要
   --without-http_auth_basic_module     # 一种简单的验证用户的方式
   --without-http_geo_module            # 据说是根据来访IP判断用户访问,可实现类似智能解析的功能,一般不需要
   --without-http_map_module            # 据说是条件赋值模块,用于复杂条件的判断, 可关闭
   --without-http_split_clients_module  # Splits clients based on some conditions
   --without-http_referer_module        # 来源referer,一般都需要
   --without-http_rewrite_module        # 重写rewrite,一般都需要
   --without-http_proxy_module          # 代理服务,其实一般也不需要
   --without-http_memcached_module      # memcached缓存模块, 通常用于服务器间共享数据, 方便但据说效率不高,一般不需要
   --without-http_limit_conn_module     # 限制连接数
   --without-http_limit_req_module      # 限制请求数等
   --without-http_empty_gif_module      # 强制返回一个在内存中的1*1的空GIF图, 通常用于访问统计/日志记录等, 可关闭
   --without-http_browser_module        # 根据访问者浏览器进行基本判断, 可关闭
   --without-http_upstream              # 对upstream进行一些控制
   --without-http_user_agent_module     # 根据user_agent做些判断,一般不需要
   --without-http_stub_status_module    # 获取Nginx自上次启动以来的工作状态,对于监控web请求数据有点作用
   --without-http                       # 关闭 HTTP server
   --without-http-cache                 # 关闭 HTTP cache
   --without-http_fastcgi_module        # 一般用来运行php,一般都需要。默认开启
   # 常用关闭的模块
   --without-http_uwsgi_module          # uWSGI protocol支持,一般不需要
   --without-http_scgi_module           # SCGI  protocol支持,一般不需要
   --without-mail_pop3_module           # 关闭 ngx_mail_pop3_module
   --without-mail_imap_module           # 关闭 ngx_mail_imap_module
   --without-mail_smtp_module           # 关闭 ngx_mail_smtp_module
   --without-http_autoindex_module      # 目录下没默认文件时,会把这个目录下的文件都列出,一般不需要
   --without-http_ssi_module            # 简单说允许html可以包含文件,一般来说也不用
   --without-pcre                       # pcre支持,一般不需要

   # 3.缓存的目录,一般不要设置
   --http-client-body-temp-path=/var/tmp/nginx/client/  # 客户端缓存
   --http-proxy-temp-path=/var/tmp/nginx/proxy/         # 代理缓存
   --http-fastcgi-temp-path=/var/tmp/nginx/fcgi/        # fastcgi缓存,比如php
   --http-uwsgi-temp-path=/var/tmp/nginx/uwsgi          # uwsgi缓存,比如python
   --http-scgi-temp-path=/var/tmp/nginx/scgi            # scgi缓存,比如python

   # 4.增加第三方的模块
   --add-module=../ngx_devel_kit-0.3.0/
   --add-module=../lua-nginx-module-0.10.10/
   --add-module=../nginx_upstream_check_module-master/
我的安装参数
./configure \
	--prefix="/usr/local/nginx" \
	--with-http_ssl_module           \
	--with-http_stub_status_module   \
	--with-http_sub_module           \
	--with-http_gzip_static_module   \
	--with-http_addition_module      \
	--with-http_flv_module           \
	--with-http_mp4_module           \
	--with-http_gunzip_module        \
	--with-http_realip_module        \
	--with-http_secure_link_module   \
	--with-http_v2_module            \
	--with-stream     \
	--add-module=./ngx_devel_kit-0.3.1/   \
	--add-module=./lua-nginx-module-0.10.20/   \
	--add-module=./nginx_upstream_check_module-0.4.0/
3.使用教程
使用教程https://www.w3cschool.cn/nginx/
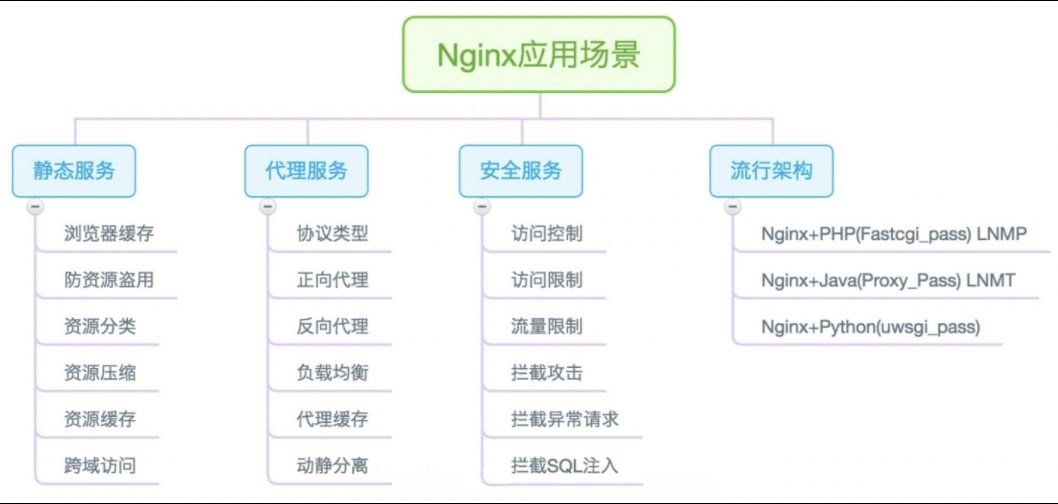
3.1.使用案例
尚学堂培训课件【网络收集】
学习案例文档:
3.2.配置说明
- 配置案例1:拆分为不同的部分进行说明
- 配置案例2:内容太多,需要到项目中看
- 配置案例3:内容太多,需要到项目中看
3.3.高可用机群部署文档
3.4.运维常见问题
- 如安装失败,一般是因安装目录未授权或安装服务器缺少依赖库导致。授权问题使用chmod命令处理,缺少的依赖库可根据报错详情使用yum全局安装或在/.configure里添加依赖。
- 如修改HTML目录后报403,一般是目录未授权导致,使用chmod授权处理。
- Nginx Log中部分参数无法输出,是因为参数未定义,Log中的参数除了自带参数,均需要先定义再输出。
- 如遇到重启无法更新配置或停止失败的情况,可使用kill -9杀死Nginx相关进程,再重新启动。
- 添加新的第三方模块,或者开启/关闭自带模块的时候,需要重新 配置、编译、安装。
- 经验1:第一次安装时的源码不要删除,最好把configuration命令记录下来,其中安装的第三方模块也一样处理
- 经验2:重新配置的时候,最好换一个目录,方便nginx回滚。
- 配置生效验证。比如最大文件打开数量,最好看下进程中的配置是否生效 ` cat /proc/{nginx的pid}/limits `
3.5.管理工具
https://github.com/NginxProxyManager/nginx-proxy-manager
4.模块
nginx模块分为两种,官方和第三方,我们通过命令 nginx -V 查看 nginx已经安装的模块!
[root@localhost sbin]# ./nginx -V
nginx version: nginx/1.28.0
built by gcc 4.8.5 20150623 (Red Hat 4.8.5-44) (GCC)
built with OpenSSL 1.0.2k-fips  26 Jan 2017
TLS SNI support enabled
configure arguments: --prefix=/usr/local/nginx --with-http_ssl_module --with-http_stub_status_module
--with-http_sub_module --with-http_gzip_static_module --with-http_addition_module --with-http_flv_module
--with-http_mp4_module --with-http_gunzip_module --with-http_realip_module --with-http_secure_link_module
--with-http_v2_module --with-stream --add-module=./ngx_devel_kit-0.3.1/ --add-module=./lua-nginx-module-0.10.20/
--add-module=./nginx_upstream_check_module-0.4.0/
对于已经使用的Nginx,增加模块的时候,需要重新编译整个Nginx。
4.1.常用的模块
1.Development Kit  Nginx的开发工具包【推荐】
  https://github.com/simpl/ngx_devel_kit

2.Echo   便捷命令,输出nginx信息
  http://wiki.nginx.org/HttpEchoModule

3.Extended status module   Nginx status模块的扩展
  http://wiki.nginx.org/Extended_status_module

4.Foot filter  在页面输出底部加入字符串
  http://wiki.nginx.org/HttpFootFilterModule

5.GeoIP IP地址识别
  http://wiki.nginx.org/Http3rdPartyGeoIPModule

6.HTTP Push   将Nginx改装成comet服务
  https://pushmodule.slact.net/

7.Limit Upload Rate   限制客户端上传速率
  https://github.com/cfsego/limit_upload_rate/

8.lua-nginx-module  使用lua可以为nginx扩展出强大的能力,比如频率限制,访问redis等【推荐】
  https://github.com/openresty/lua-nginx-module

9.ModSecurity   web应用防火墙
  http://www.modsecurity.org/projects/modsecurity/nginx/index.html

10.PageSpeed   google开发的 高性能传输、低延时,基于nginx的页面加速
  http://ngxpagespeed.com/ngx_pagespeed_example/

11.Secure Download   创建安全现在链接
  http://wiki.nginx.org/HttpSecureDownload

12.SysGuard   当系统负载过高时,保护系统
  https://github.com/alibaba/nginx-http-sysguard

13.nginx_upstream_check_module   后端健康检查【推荐】
  https://github.com/yaoweibin/nginx_upstream_check_module
4.2.lua 模块
lua 是 openresty 先提出来的。所有想要在Nginx上使用lua,最好选择使用openresty,在Nginx集成是比较麻烦的。
1.下载相关软件
# 不要下载官网的,要去下载openresty的优化版本,lua-nginx-module 模块会报错
luajit: wget --no-check-certificate https://github.com/openresty/luajit2/archive/refs/tags/v2.1-20210510.tar.gz

# resty 的 lua 依赖库【必须】
lua-resty-core:wget --no-check-certificate https://github.com/openresty/lua-resty-core/archive/refs/tags/v0.1.22.tar.gz
lua-resty-lrucache:wget --no-check-certificate https://github.com/openresty/lua-resty-lrucache/archive/refs/tags/v0.11.tar.gz

# Nginx
nginx-1.22.50:wget --no-check-certificate http://nginx.org/download/nginx-1.17.5.tar.gz

# Nginx的第三方模块
lua-nginx-module:wget --no-check-certificate https://github.com/openresty/lua-nginx-module/archive/refs/tags/v0.10.20.tar.gz
ngx_devel_kit:wget --no-check-certificate https://github.com/vision5/ngx_devel_kit/archive/refs/tags/v0.3.1.tar.gz
2.解压与安装环境
# 1.安装lua。注意:我们的电脑可能已经安装了别的版本的lua。所有我们最好但是安装一个新的目录
tar -zxvf luajit2-2.1-20210510.tar.gz
cd luajit2-2.1-20210510
make install  PREFIX=/usr/local/LuaJIT

# 2.添加lua环境变量
export LUAJIT_LIB=/usr/local/LuaJIT/lib
export LUAJIT_INC=/usr/local/LuaJIT/include/luajit-2.1

# 3.安装Lua核心库
tar -zxvf lua-resty-core-0.1.21.tar.gz [必须]
tar -zxvf lua-resty-lrucache-0.11.tar.gz [必须]

# 4.安装在同一个目录下
cd lua-resty-core-0.1.22
make install PREFIX=/usr/local/lua_core

cd ../lua-resty-lrucache-0.11
make install PREFIX=/usr/local/lua_core


# 5.安装nginx,并添加目录
解压: lua-nginx-module 和 ngx_devel_kit 后,重新配置、编译、安装nginx
    省略。。。。。。。。
	--add-module=./ngx_devel_kit-0.3.1/   \
	--add-module=./lua-nginx-module-0.10.20/

# 6.加载lua库,加入到ld.so.conf文件
vim  /etc/ld.so.conf
/usr/local/lib
/usr/local/LuaJIT/lib
3.修改nginx配置
#修改nginx.conf,添加在http模块下
# 指定lua模块路径,多个之间";"分隔,其中";;"表示默认搜索路径,默认到nginx的根目录下找
lua_package_path "/usr/local/lua_core/lib/lua/?.lua;;";

# 添加一个测试lua是否生效的server
server {
    listen       8080;
    server_name  127.0.0.1 www.zx.com;

    location /lua {
        set $test "hello,world";
        content_by_lua '
            ngx.header.content_type="text/plain"
            ngx.say(ngx.var.test)';
    }
}

访问地址
curl http://127.0.0.1:8080/lua
返回:hello,world
问题1:nginx: error while loading shared libraries: libluajit-5.1.so.2: cannot open shared object file: No such file or directory
出现这个错误,是变量没有写进去,所以就添加变量:
cat /etc/ld.so.conf
include ld.so.conf.d/*.conf

# 添加环境变量的路径。就是lua默认安装的路径
echo "/usr/local/lib" >> /etc/ld.so.conf
echo "/usr/local/LuaJIT/lib" >> /etc/ld.so.conf
刷新配置: ldconfig
问题2:nginx: [alert] detected a LuaJIT version which is not OpenResty's; many optimizations will be disabled and performance will be compromised (see https://github.com/openresty/luajit2 for OpenResty's LuaJIT or, even better, consider using the OpenResty releases from https://openresty.org/en/download.html)
需要安装OpenResty优化的lua
1.卸载LuaJIT官网主分支版本,然后重新安装openresty提供的luajit优化版即可
make uninstall
make clean

2.下载安装openresty的lua。 https://github.com/openresty/luajit2/tags
安装过程参考上面的案例
问题3:nginx: [alert] failed to load the 'resty.core' module (https://github.com/openresty/lua-resty-core); ensure you are using an OpenResty release from https://openresty.org/en/download.html (reason: module 'resty.core' not found:
安装lua-resty-core和依赖文件lua-resty-lrucache。参考上面案例,安装的时需要指定安装目录,并在 nginx.conf 中指定lua模块路径, 多个之间";"分隔,其中";;"表示默认搜索路径,默认到nginx的根目录下找
lua_package_path "/usr/local/lua_core/lib/lua/?.lua;;";
4.2.nginx的客户端状态
- 内置模块: –with-http_stub_status_module
- 配置语法: stub_status;
 server {
     listen       8080;
     server_name  127.0.0.1 www.zx.com;
     location /nginx_status {
         stub_status on;
     }
 }
访问地址
curl http://192.168.3.101:8080/nginx_status

Active connections: 2
server accepts handled requests
 9 9 8
Reading: 0 Writing: 1 Waiting: 1
nginx七种状态
- Active connections : 当前活跃的连接数。
- accepts TCP连接总数
- handled 正在通讯的TCP连接数
- requests 成功的请求数,正常情况,accepts=handled,意味着没有连接丢失。这个数字为累计的值
- Reading 读取的请求头
- Writing 响应
- Waiting 等待的请求数,开启了keepalive
4.3.后端服务健康检测
- 第三方模块: nginx_upstream_check_module 和 自带的检测功能
- 下载地址: https://github.com/yaoweibin/nginx_upstream_check_module
安装: 需要针对不同版本的nginx安装不同的补丁。
nginx自带健康检查的缺陷:
- Nginx只有当有访问时后,才发起对后端节点探测。
- 如果本次请求中,节点正好出现故障,Nginx依然将请求转交给故障的节点,然后再转交给健康的节点处理。所以不会影响到这次请求的正常进行。但是会影响效率,因为多了一次转发。
- 自带模块无法做到预警。
被动健康检查。使用nginx_upstream_check_module:
- 区别于nginx自带的非主动式的心跳检测,淘宝开发的tengine自带了一个提供主动式后端服务器心跳检测模块,若健康检查包类型为http, 在开启健康检查功能后,nginx会根据设置的间隔向指定的后端服务器端口发送健康检查包,并根据期望的HTTP回复状态码来判断服务是否健康。
- 后端真实节点不可用,则请求不会转发到故障节点
- 故障节点恢复后,请求正常转发
upstream my_demo{
    # 【被动检查】1.nginx自带的健康检测
    #max_fails=1和fail_timeout=10s
    # 表示在单位周期为10s钟内,中达到1次连接失败,那么接将把节点标记为不可用,
    # 并等待下一个周期(同样时常为fail_timeout)再一次去请求,判断是否连接是否成功。
    server 127.0.0.1:8001 max_fails=1 fail_timeout=10s;
    server 127.0.0.1:8002 max_fails=1 fail_timeout=10s;

    # 【主动检查】2.nginx_upstream_check_module配置,如默认的基于端口存活的健康检查不满足要求,可配置基于URI的健康检查,根据返回code判断后端Server是否存活
    #以下心跳检测的规则是:检测方式为http, 每3000ms检测一次,成功2次标识为存活,失败3次则标识后端服务为不存活,检测超时时间为1000ms
    check type=http interval=3000 rise=2 fall=3 timeout=1000;

    #配置检测的URI,例如 /test是后端写的一个接口
    check_http_send "HEAD /test HTTP/1.0\r\n\r\n";

    #配置正常返回code,即后端返回2xx或3xx均视为正常返回,其他code视为异常
    check_http_expect_alive http_2xx http_3xx;
}

server {
    listen 8080;
    server_name  127.0.0.1 www.zx.com;
    location / {
        proxy_pass         	http://my_demo;
        proxy_set_header  	X-Forwarded-For $proxy_add_x_forwarded_for;
        proxy_set_header   	HOST   $host;
        proxy_set_header   	X-Real-IP $remote_addr;
        proxy_set_header 	Accept-Encoding "";
        proxy_intercept_errors on;
    }
    # 查看nginx_upstream_check_module检测的结果
    location /status  {
        check_status;
        access_log off;
    }
}
check配置说明
- interval:向后端发送的健康检查包的间隔,单位为毫秒
- fall(fall_count): 如果连续失败次数达到fall_count,服务器就被认为是down。
- rise(rise_count): 如果连续成功次数达到rise_count,服务器就被认为是up。
- timeout: 后端健康请求的超时时间,单位毫秒。
- default_down: 设定初始时服务器的状态,如果是true,就说明默认是down的,如果是false,就是up的。默认值是true,也就是一开始服务器认为是不可用,要等健康检查包达到一定成功次数以后才会被认为是健康的。
- type:健康检查包的类型,现在支持以下多种类型:
- tcp:简单的tcp连接,如果连接成功,就说明后端正常。
- ssl_hello:发送一个初始的SSL hello包并接受服务器的SSL hello包。
- http:发送HTTP请求,通过后端的回复包的状态来判断后端是否存活。
- mysql: 向mysql服务器连接,通过接收服务器的greeting包来判断后端是否存活。
- ajp:向后端发送AJP协议的Cping包,通过接收Cpong包来判断后端是否存活。
- port: 指定后端服务器的检查端口。你可以指定不同于真实服务的后端服务器的端口,比如后端提供的是443端口的应用,你可以去检查80端口的状态来判断后端健康状况。默认是0,表示跟后端server提供真实服务的端口一样。该选项出现于Tengine-1.4.0。
检测过程的日志:【error.log】
## 出现3次send() failed,就将这个节点设置为 down
2022/11/26 19:52:25 [error] 25218#0: send() failed (111: Connection refused)
2022/11/26 19:52:28 [error] 25218#0: send() failed (111: Connection refused)
2022/11/26 19:52:31 [error] 25218#0: send() failed (111: Connection refused)
## 127.0.0.1:8001  这个服务设置为 down,并关闭健康检测
2022/11/26 19:52:31 [error] 25218#0: disable check peer: 127.0.0.1:8001
## 服务正常后,这个服务设置为 up,并开始健康检测
2022/11/26 19:53:54 [error] 25218#0: enable check peer: 127.0.0.1:8001
问题1:[error] 15265#0: *168 http upstream check module can not find any check server, make sure you've added the check servers, client: 192.168.3.20, server: 127.0.0.1, request: "GET /status/ HTTP/1.1", host: "192.168.3.101:8080"
ngx_http_upstream_hash_module 需要针对不同版本的nginx安装不同的补丁。 补丁需要安装在nginx目录
# 1.安装patch
yum -y install patch

# 2.安装补丁
patch -p1 < ../nginx_upstream_check_module-master/check_1.20.1+.patch

patching file src/http/modules/ngx_http_upstream_hash_module.c
patching file src/http/modules/ngx_http_upstream_ip_hash_module.c
patching file src/http/modules/ngx_http_upstream_least_conn_module.c
patching file src/http/ngx_http_upstream_round_robin.c
patching file src/http/ngx_http_upstream_round_robin.h
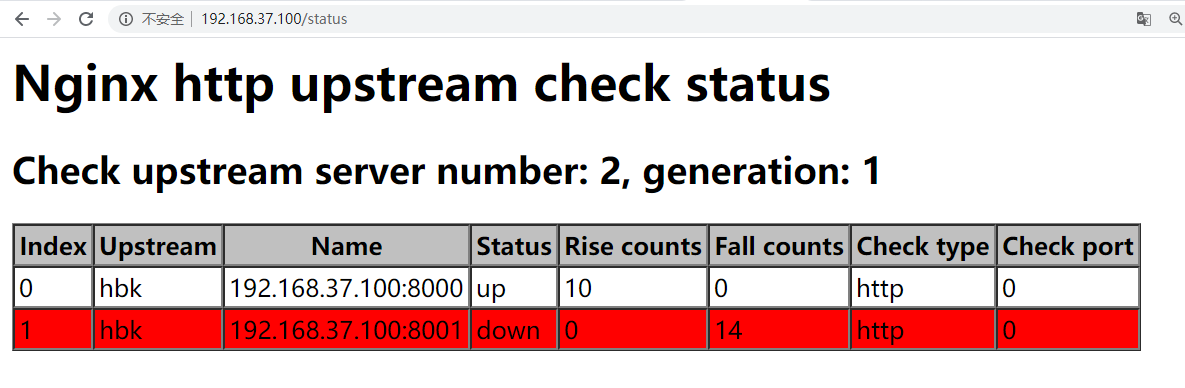
4.4.流量带宽请求状态统计
- 第三方模块: ngx_req_status
- 下载地址:https://github.com/zls0424/ngx_req_status
- nginx 变量与监控
zone_name       key     max_active      max_bw  traffic requests        active  bandwidth
imgstore_appid  43    27      6M      63G     374063  0        0
imgstore_appid  53    329     87M     2058G   7870529 50      25M
server_addr     10.128.1.17     2        8968   24M     1849    0        0
server_addr     127.0.0.1       1       6M      5G      912     1        0
server_name     d.123.sogou.com 478     115M    2850G   30218726        115     39M

zone_name   - 利用req_status_zone定义的分组标准。例如,按照服务器名称对请求进行分组后;
key         - 请求按分组标准分组后的分组标识(即组名)。例如按服务器名称分组时,组名可能是localhost;
max_active  - 该组的最大并发连接数;
max_bw      - 该组的最大带宽;
traffic     - 该组的总流量;
requests    - 该组的总请求数;
active      - 该组当前的并发连接数;
bandwidth   - 该组当前带宽。
5.高阶使用教程
5.1.map
map 指令是由 ngx_http_map_module 模块提供的,默认情况下安装 nginx 都会安装该模块。
map 的主要作用是创建自定义变量,通过使用 nginx 的内置变量,去匹配某些特定规则,如果匹配成功则设置某个值给自定义变量。 而这个自定义变量又可以作于他用。
案例
# $args 是nginx内置变量,就是获取的请求 url 的参数
# 如果 $args 匹配到URL变量 debug, 那么 $my_param 的值会被设为 1 ,
# 如果 $args 一个都匹配不到 $my_param 就是default 定义的值,在这里就是 0
map $args $my_param {
    default 2;
    debug   1;
}
server {
    listen       8080;
    server_name  localhost;
    location / {
        root   html;
        index  $my_param.html;
    }
}
5.2.if
使用案例。if 后面必须有一个空格。
# 1.返回状态
server {
    ## 自定义的变量为1的时候返回501
    if ($my_param = 1) {
        return 501;
    }
}

# 2.流向不同的代理服务
location / {
    root    html;
    index   index.html index.htm index.php;
    proxy_redirect      off;
    proxy_set_header    X-Forwarded-For $proxy_add_x_forwarded_for;
    proxy_set_header    X-Real-IP $remote_addr;
    proxy_set_header    Host $http_host;
    proxy_http_version  1.1;
    proxy_set_header    Connection "";

    if ($my_param = 1) {
        proxy_pass  http://127.0.0.1:8001;
        break;
    }
    if ($my_param = 2) {
        proxy_pass  http://127.0.0.1:8002;
        break;
    }
}
5.3.try_files
try_files是nginx中http_core核心模块所带的指令,主要是能替代一些rewrite的指令,提高解析效率
示例一:
    location /demo/ {
        try_files $uri /demo/default.gif;
    }
说明:
    1、访问www.example.com/demo/123/321(文件不存在)时,此时看到的是default.gif图片,URL地址不变
    2、访问www.example.com/demo/123.png(文件存在)时,此时看到的是123.png图片,URL地址不变
总结:当images目录下文件不存在时,默认返回default.gif

示例二:
    location /demo/ {
        try_files $uri =403;
    }
说明:
    1、访问www.example.com/demo/123.html(文件存在)时,此时看到的是123.html内容,URL地址不变
    2、访问www.example.com/demo/21.html(文件不存在)时,此时看到的是403状态,URL地址不变
总结:和示例一一样,只是将默认图片换成了403状态

示例三:
    location /demo/ {
        try_files $uri @ab;
    }
    location @ab {
        rewrite ^/(.*)$ https://blog.demo.com;
    }
说明:
    1、访问www.example.com/demo/123.html(文件存在)时,此时看到的是123.html内容,URL地址不变
    2、访问www.example.com/demo/21.html(文件不存在)时,此时跳转到其他代理,URL地址改变
    总结:当文件不存在时,会去查找@ab值,此时在location中定义@ab内容

示例四:
    try_files $uri @pro;
    location @pro {
        proxy_set_header Host $host;
        proxy_set_header X-Real-IP $remote_addr;
        proxy_set_header X-Forwarded-For $proxy_add_x_forwarded_for;
        proxy_pass https://blog.demo.com;
    }
说明:
    1、访问www.example.com/123.html(文件存在)时,此时看到的是123.html内容,URL地址不变
    2、访问www.example.com/post-3647.html(文件不存在)时,此时跳转到其他代理,URL地址不变
总结:当前服务器上文件不存在时,会进行反向代理
5.4.tcp参数优化
当我们使用浏览器访问nginx的时候,会发现一次请求之后会增加至少2个tcp连接。这是为什么呢?
查看tcp:
for i in {1..1000};do netstat -tn | grep '8090' |awk '/^tcp/ {++S[$NF]} END {for(a in S) printf "%-15s\t%-5s", a, S[a] ; print "" }' && sleep 1;done
| 为什么是双倍: ` netstat -atnx | grep ‘8090' ` |
接口被访问后,一方面 nginx需要和调用方建立tcp,另一方面,nginx需要和后端服务建立tcp,所有tcp数量就是双倍的并发数
# 协议                  本地地址                  远程地址                 状态
Proto   Recv-Q Send-Q   Local Address           Foreign Address         State
tcp        0      0     0.0.0.0:8090            0.0.0.0:*               LISTEN
tcp        0      0     127.0.0.1:8090          127.0.0.1:59824         ESTABLISHED
tcp        0      0     127.0.0.1:59824         127.0.0.1:8090          ESTABLISHED
| 文件打开数量【不太准确,因为http短连接太快了,只能看到某个时刻的量】: ` lsof -p 7534 | wc -l ` |
TCP的keepalive
[root@ ~]# sysctl -a  |grep tcp_keepalive
net.ipv4.tcp_keepalive_time = 1200
net.ipv4.tcp_keepalive_probes = 9
net.ipv4.tcp_keepalive_intvl = 75
参数解释:
- tcp_keepalive_time 1200 ,tcp建立链接后1200 秒如果无数据传输,则会发出探活数据包
- tcp_keepalive_probes 9 , 共发送9次
- tcp_keepalive_intvl 75 ,每次间隔75秒
KeepAlive并不是默认开启的,在Linux系统上没有一个全局的选项去开启TCP的KeepAlive。需要开启KeepAlive的应用必须在TCP的socket中单独开启。
TCP socket也有三个选项和内核对应,通过setsockopt系统调用针对单独的socket进行设置:
- TCPKEEPCNT: 覆盖 tcpkeepaliveprobes
- TCPKEEPIDLE: 覆盖 tcpkeepalivetime
- TCPKEEPINTVL: 覆盖 tcpkeepalive_intvl
前端长连接
http {
    # 设置客户端连接保持活动的超时时间,单位秒。在超过这个时间之后,Nginx会关闭该连接,默认值60
    # 使用keepalive必须使用下面两个指令,因为只有http1.1协议才支持keepalive,http1.0是不支持的
    keepalive_timeout 10;

    #在一个tcp连接上,最多执行多少个http请求,默认值100
    keepalive_requests 100;
}
后端长连接
upstream my_server{
    server 127.0.0.1:8080;
    keepalive 1000; # 这个很重要!缓存的连接个数
}
location / {
    proxy_http_version 1.1;              # 设置http版本为1.1
    proxy_set_header Connection "";      # 设置Connection为长连接(默认为no)
}
内核长连接优化
参考《网络协议》文章中的优化
5.6.配置热更新
reload 并不是热更新,而是关闭旧worker进程后启动新worker进程。过程中会引起流量抖动,对长连接影响尤为明显。在网关的集群规模非常大时,更是不能随意的做 reload。
现在已经有很多主流应用选择采用长连接,HTTP 1.1 一般默认会使用 Keep-Alive 去保持长连接,后续 HTTP 2 以及 HTTP 3 也是如此, 随着网络协议的发展,未来使用长连接会变得更加普遍。而配置热更新天然对长连接非常友好。
如何解决这点呢?一是采用两层网关,即流量网关 + 业务网关;二是实现网关原生支持配置热更新
5.7.缓存优化
1.配置浏览器缓存时间。通过设置HTTP响应头中的Expires和Cache-Control字段,可以控制浏览器缓存的时间。
location ~* \.(jpg|jpeg|gif|png|css|js)$ {
    add_header Cache-Control "public, max-age=31536000"; # 设置静态资源的缓存时间为1年(单位:秒)
}
2.配置代理服务器缓存时间。如果Nginx作为反向代理服务器使用,可以通过设置proxy_cache_valid和proxy_cache_valid指令来控制代理服务器的缓存时间。
location / {
    proxy_pass http://backend; # 将请求转发到后端服务器
    proxy_cache mycache; # 启用缓存,命名为mycache
    proxy_cache_valid 200 302 60m; # 设置缓存有效时间为60分钟(单位:秒)
    proxy_cache_valid 404 1m; # 设置缓存有效时间为1分钟(单位:秒)
}
6.最佳实践
6.1.性能优化
一:服务器设置
1. 调整同时打开文件数量            ulimit -n 65535 。甚至更高
2. TCP最大连接数【最大并发数】      修改 /etc/security/limits.conf 和 sysctl.conf
    # limits.conf
    * soft nofile 65535
    * hard nofile 65535

    # sysctl.conf
    net.core.somaxconn = 65535                  # 系统最大连接数。默认1024
    net.ipv4.tcp_max_syn_backlog = 4096         # 队列大小
    net.ipv4.ip_local_port_range = 1024 65000   # 端口范围。tcp堆外提供连接时使用。
3. 不做TCP洪水抵御
    net.ipv4.tcp_syncookies=0

二、nginx设置
1、工作进程与连接数配置
    1. worker_rlimit_nofile             文件打开数量,与ulimit -n一致
    2. worker_processes   auto          子进程数量,保持与CPU核数一致
    3. worker_connections 65535         指定单个工作进程的最大并发连接数,所有工作进程的连接数之和需小于系统的最大句柄打开数ulimit -n
        1).在作为反向代理时,根据经验值,预估最大连接数=worker_processes*worker_connections/4,各系统可参考此公式评估单机Nginx的最大承载并发
        2).在作为http服务时,根据经验值,预估最大连接数=worker_processes*worker_connections/2,各系统可参考此公式评估单机Nginx的最大承载并发
    4. worker_priority -10              工作进程优先级(-20到20,数值越小优先级越高);
    5. worker_cpu_affinity auto         CPU亲和性绑定,避免进程在CPU间切换;
2、事件驱动模型优化
events {
    1. use epoll                        强制使用epool(Linux最优选择)
    2. multi_accept on                  允许同时接受多个连接,默认off。
    3. worker_connections  65535        连接数配置
    4. accept_mutex off                 接受连接后立即禁用accpet锁
}

3、HTTP核心配置优化
http {
    # 1.开启零拷贝函数。sendfile_max_chunk  1m; 设置最大分片大小为1MB。
    sendfile on;
    tcp_nopush on;
    tcp_nodelay on;

    # 2.连接超时配置(复用连接,减少创建链接的次数。前端设置,与后端的服务也需要设置。)
    keepalive_timeout 60;            # 如果是后端服务器的nginx。禁止 keepalive_timeout,可以有效降低句柄占用数量。
    keepalive_requests 10000;
    client_header_timeout 10;
    client_body_timeout 10;
    send_timeout 10;

    # 3.缓冲区大小优化
    client_header_buffer_size 4k;
    large_client_header_buffers 88k;
    client_body_buffer_size 128k;
    client_max_body_size 50m;

    # 4.开启gzip压缩
    gzip on;
    gzip_vary on;
    gzip_min_length 1000;
    gzip_comp_level 6;
    gzip_types
        text/plain
        text/css
        text/javascript
        application/javascript
        application/json
        application/xml;

    # 4.安全
    server_tokens off  隐藏版本信息
    listen 443 ssl http2;        启用HTTPS并启用HTTP/2协议支持功能。
}


4、连接池和缓存优化
http {
    # 1. 连接池配置
    upstream backend {
        keepalive 300;
        keepalive_requests 10000;
        keepalive_timeout   60s;

        server192.168.1.100:8080 weight=3 max_fails=3 fail_timeout=30s;
        server192.168.1.101:8080 weight=2 max_fails=3 fail_timeout=30s;
    }

    # 2. 打开文件缓存
    open_file_cache max=100000 inactive=20s;
    open_file_cache_valid 30s;
    open_file_cache_min_uses 2;
    open_file_cache_errors on;

    # 3.FastCGI缓存配置(适用于PHP)
    fastcgi_cache_path /var/cache/nginx levels=1:2 keys_zone=fcgi:100m inactive=60m;
    fastcgi_cache_key "$scheme$request_method$host$request_uri";
    fastcgi_cache_use_staleerror timeout invalid_header http_500;
}

5、限流和防护配置
http {
    # 1. 限速(时间窗口)
    limit_req_zone $binary_remote_addr zone=api:10m     rate=100r/s;
    limit_req_zone $binary_remote_addr zone=login:10m   rate=5r/s;

    # 2. 限制连接数:限制服务 server_name  限制客户端 binary_remote_addr
    limit_conn_zone $binary_remote_addr zone=perip:10m;
    limit_conn_zone $server_name        zone=perserver:10m;

    server {
        # 3. 应用限流规则
        limit_req zone=api burst=200 nodelay;
        limit_conn perip 20;
        limit_conn perserver 2000;

        # 4.静态资源长缓存
        location~* \.(jpg|jpeg|png|gif|ico|css|js)$ {
            expires 1y;
            add_header Cache-Control "public, immutable";
        }

        # 5.API接口优化
        location /api/ {
            # 限流(漏桶限流算法)
            limit_req zone=api burst=50 nodelay;
            proxy_pass http://backend;
            proxy_http_version 1.1;
            proxy_set_header Connection "";
            proxy_connect_timeout 5s;
            proxy_send_timeout 10s;
            proxy_read_timeout10s;
        }
    }
}

# 压测基本性能
ab -c 10000 -n 150000 http://127.0.0.1/index.html

# 监控
#!/bin/bash
# nginx_monitor.sh - Nginx性能监控脚本
echo"=== Nginx连接状态 ==="
ss -s

echo"=== 活跃连接数 ==="
netstat -n | awk '/^tcp/ {++S[$NF]} END {for(a in S) print a, S[a]}'

echo"=== Nginx进程状态 ==="
ps aux | grep nginx | grep -v grep

echo"=== 系统负载 ==="
uptime

echo"=== 内存使用情况 ==="
free -h

echo"=== Nginx访问统计 ==="
curl -s http://localhost/nginx_status
6.2.动态封禁IP
在 Nginx 中实现动态封禁 IP,可以有效保护网站或应用免受恶意请求、爬虫或 DDoS 攻击。 相比于传统的修改配置文件 + 重载 Nginx 的静态方式,动态封禁能够自动识别、实时阻断恶意 IP,大大提升安全性和运维效率。
- Fail2ban。监控 Nginx 日志,达到阈值后调用防火墙或修改配置封禁,配置简单,社区成熟,支持多种服务。
- 缺点:依赖日志分析,有延迟,频繁重载影响性能
- 适用场景:防暴力破解、扫描器、异常请求攻击
- Nginx Lua + Redis。使用 ngx_lua 在访问阶段查询 Redis 黑名单,性能高,实时生效,可分布式共享。
- 缺点:需要 OpenResty/Lua,架构复杂
- 适用场景:高并发场景,分布式共享黑名单,精细化策略
- Nginx 内置模块。limit_req_zone 和 limit_conn_zone 限制请求频率和并发,原生支持。
- 缺点:仅限流/限连接,不能真正封禁
- 适用场景:防 CC 攻击、防止单 IP 滥用
7.原理
7.1.启动原理
nginx是一个master进程和多个worker进程,worker进程是master进程的子进程。
- master进程负责创建socket句柄、创建和管理worker进程、配置检测 和 配置热更新。
- worker进程负责与客户端建立连接,并处理请求。
1. master 创建socket,那为什么是worker进程与客户端创建连接
前提:
- Linux中子进程可以继承父进程的socket 的 fd,可以监听并接收父进程socket的信息。
- Socket 的创建涉及到一系列的系统调用,如 创建:socket(), 绑定端口:bind(), 开启监听:listen(), 接收数据:accept() 等
nginx启动时
- master启动后会创建socket,并开启socket的监听。
- 然后master创建worker进程,继承了master的socket fd,开启监听,并调用accept开始接收数据。
- 没有请求时worker进程进入休眠状态;当客户端发送过来消息,内核会调用监听的回调唤醒worker进程进行处理。
2. 当一个请求过来时,如果判断有哪个worker处理
惊群问题:当多个子进程监听并接受同一个socket fd后,当客户端发送请求时,唤醒所有worker进程去尝试与客户端的连接, 但是只会有一个worker进程会成功,其他尝试失败的进程会继续休眠,这种方式会很大程度长浪费系统资源,这就是惊群问题(羊群效应)
nginx是如何实现的:nginx 提供了accept_mutex特性,他是一种互斥锁。 因为worker进程创建之后,调用accept,如果底层使用的是epoll,就意味着每个worker都创建了一个epoll_fd来管理自己竞争到的connect_fd和公共的listen_fd; https://tengine.taobao.org/book/chapter_2.html#connection
accept_mutex的效果:当一个新连接到达时,如果激活了accept_mutex,那么多个Worker将以串行方式来处理,只有一个Worker会被唤醒,其他继续保持休眠状态; 如果没有激活accept_mutex,那么所有的Worker都会被唤醒,不过只有一个Worker能获取新连接,其它的Worker会重新进入休眠状态。
events {
	accept_mutex on
}
最贱实践:Nginx默认开启accept_mutex,是一种保守的选择。如果关闭了它,可能会引起一定程度的惊群问题, 表现为上下文切换增多(sar -w)或者负载上升,但是如果流量太大的话,为了保障吞吐量,可以尝试关闭。 Nginx作者给出的解释
注意:高版本内核的Linux,accept不存在惊群问题。
Nginx的重启过程
使用 nginx -s reload 或者 kill -HUP pid (master 进程id)
- 向master进程发送HUP信号。
- master进程收到HUP信号后开始校验配置文件语法的正确性。
- master进程尝试打开新的监听端口(如果配置文件中新增了服务端口)。
- master进程使用新配置启动新的worker子进程。
- master进程向老worker子进程发送QUIT信号。
- 老worker收到QUIT信号后,首先关闭监听端口,从而不会再接受新的连接,然后处理完当前连接后结束进程。
总结:先启动新worker再关闭老worker来保证服务不中断的。新worker启动后就可以接受新连接,而老worker只有在处理完当前连接后再结束。 本质就是TCP状态变化,但是什么是"处理完当前连接",因为TCP数据交互没有明确的结束点,所以在TCP进入CLOSE_WAIT状态,等待后端响应。
8.常见问题
1. nginx被人诟病问题有什么?
- nginx转发到后端服务的时候,会缓存tcp到连接池中。通常nginx会启动多个worker进程,这时每个worker中都会产生连接池。 导致连接复用率不高。当worker数量非常大的时候,不仅造成资源的浪费,也会增加创建连接的耗时,降低服务的吞吐量。
反向代理域名,域名ip变更后,nginx解析没有一起变更
如果后端服务使用域名而非 IP 地址,当域名解析的 IP 发生变化时,默认情况下 Nginx 不会自动更新解析结果,需要通过以下方式处理:
- 手动执行 reload:nginx -s reload,重启子进程。
- 动态解析方案(无需手动 reload,适合大规模流量的情况下)
http {
    # 指定DNS服务器(Google的公共DNS),valid=30s 表示缓存 30 秒
    resolver 8.8.8.8 8.8.4.4 valid=30s;
    resolver_timeout 5s;

    server {
        listen 80;
        server_name example.com;

        location / {
            proxy_pass http://backend.example.com;
            proxy_set_header Host $host;
            proxy_set_header X-Real-IP $remote_addr;
        }
    }
}
- 本文作者:zhangxue
- 本文链接:https://lucksnow1989.github.io/article/6.web服务器/Nginx.html
- 版权声明:本文为本人原创文章,遵循 CC 4.0 BY-NC-SA版权协议,转载请附上原文出处链接和本声明。