 张雪随笔
3.GitLab
- 官网首页:https://about.gitlab.com/
- 官网文档:https://docs.gitlab.com/
- 官网安装【极狐】:https://about.gitlab.cn/install/
- 中文教程:https://www.cnblogs.com/sanduzxcvbnm/category/1777794.html
- 美团代码托管平台的演进与实践
GitLab,是一个利用 Ruby on Rails 开发的开源应用程序,实现一个自托管的Git项目仓库,可通过Web界面进行访问公开的或者私人项目安装。
它拥有与GitHub类似的功能,能够浏览源代码,管理缺陷和注释。可以管理团队对仓库的访问,它非常易于浏览提交过的版本并提供一个文件历史库。
团队成员可以利用内置的简单聊天程序(Wall)进行交流。它还提供一个代码片段收集功能可以轻松实现代码复用,便于日后有需要的时候进行查找。
1.安装
基于 CentOS 7 搭建 GitLab:https://cloud.tencent.com/developer/labs/lab/10288
- 我们使用选择Gitlab官方提供的SaaS服务【与GitHub一样的服务】
- 可以选择Gitlab的私有化部署服务–Gitlab极狐【分为收费版和免费版】
- 也可以使用社区版【完全免费】
大多是公司选择使用的都是社区版,本文档也是以社区版进行说明的。以下安装的环境是 centos7.4 cpu4 mem8
1.1.配置基础环境
- 配置yum源
vim /etc/yum.repos.d/gitlab-ce.repo
[gitlab-ce]
name=Gitlab CE Repository
baseurl=https://mirrors.tuna.tsinghua.edu.cn/gitlab-ce/yum/el$releasever/
gpgcheck=0
enabled=1
- 更新本地yum缓存
yum makecache
- 安装 postfix
GitLab 需要使用 postfix 来发送邮件。
yum install -y postfix
打开 /etc/postfix/main.cf 文件,在第 119 行附近找到 inet_protocols = all,将 all 改为 ipv4
inet_protocols = ipv4
启用并启动 postfix
systemctl enable postfix
systemctl start postfix
- 配置 swap 交换分区
由于 GitLab 较为消耗资源,我们需要先创建交换分区,以降低物理内存的压力。
在实际生产环境中,如果服务器配置够高,则不必配置交换分区。
新建 2 GB 大小的交换分区:
dd if=/dev/zero of=/root/swapfile bs=1M count=2048
格式化为交换分区文件并启用:
mkswap /root/swapfile
swapon /root/swapfile
添加自启用。打开 /etc/fstab 文件,在文件最后添加新的一行
/root/swapfile swap swap defaults 0 0
1.2.安装
- 安装GitLab社区版
yum install gitlab-ce #自动安装最新版本
注:若需安装指定版本,则添加版本号即可,即yum install gitlab-ce-x.x.x
1.3.修改默认配置
vim /etc/gitlab/gitlab.rb
Ps:这个文件非常大,有3000行配置。配置文件中已经将文档的地址备注上去了,想要修改的时候可以查看
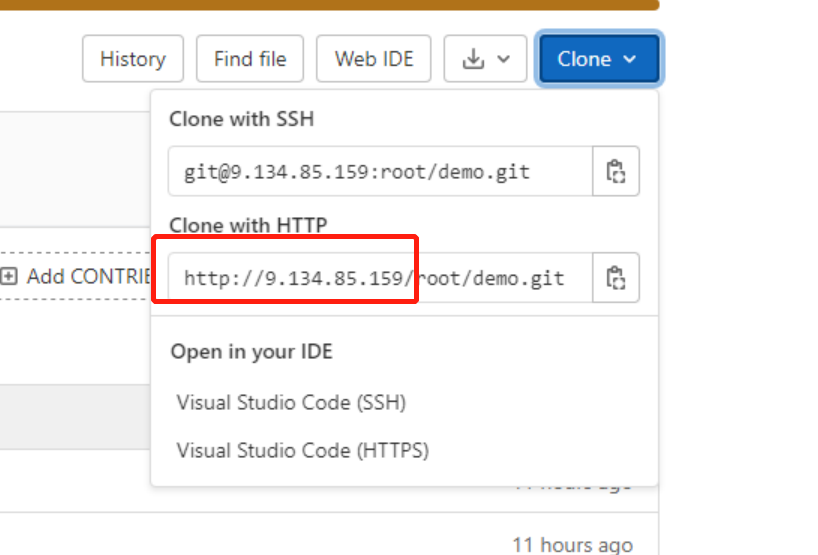
- 修改git访问地址【必选】。
# 1.http访问地址,可以写域名。如果端口不写的话默认为80端口
external_url='http://9.134.85.159'

# 2.ssh方式端口
#ssh主机ip
gitlab_rails['gitlab_ssh_host'] = '9.134.85.159'
#ssh连接端口
gitlab_rails['gitlab_shell_ssh_port'] = 9922
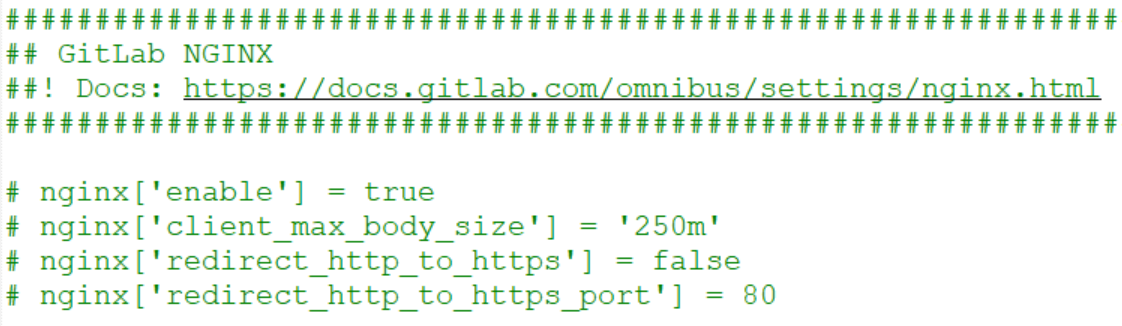
- Nginx模块配置【可选】
用于外部访问Gitlab的配置。比如,默认端口是80。
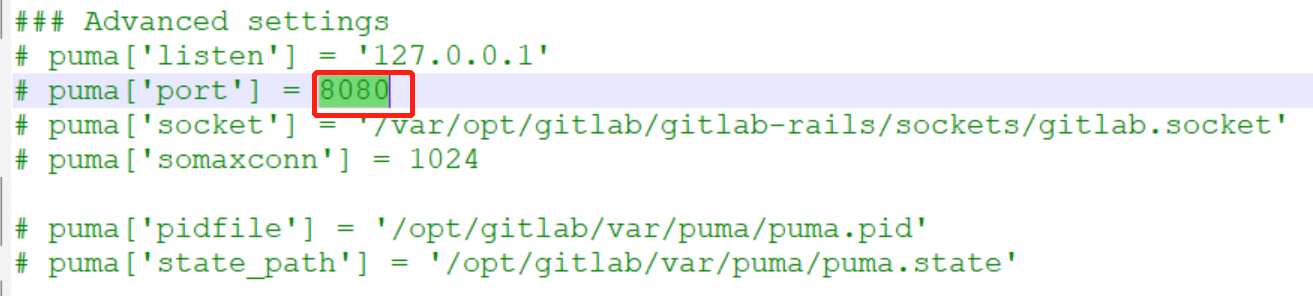
- puma模块配置【可选】
服务器本地的端口,Nginx会直接访问这个地址。默认8080端口,比如我们的服务器上已经有8080端口了,我们就需要修改这个地址了。需要修改2个地址

- 配置邮箱
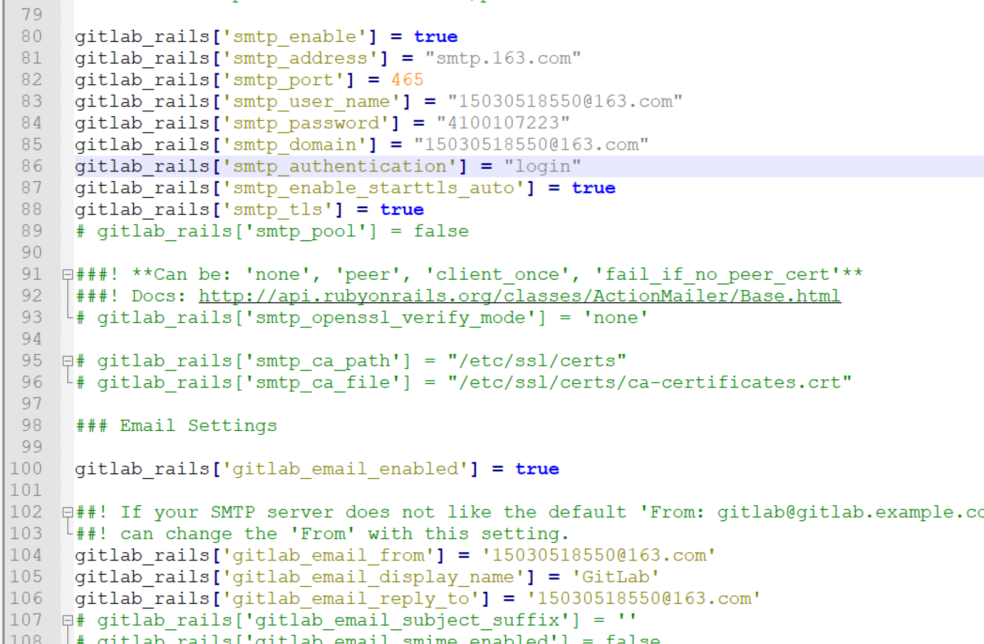
部署成功后验证邮箱:gitlab-rails console
Notify.test_email(‘test@example.com','Message Subject','Hello, 2020!').deliver_now
- 防火墙配置【可选】
配置防火墙,打开 /etc/sysctl.conf 文件
net.ipv4.ip_forward = 1
启用并启动防火墙
systemctl enable firewalld
systemctl start firewalld
放通 HTTP
firewall-cmd --permanent --add-service=http
重启防火墙
systemctl reload firewalld
查看防火墙的状态
systemctl status firewalld
修改clone地址:https://ftxtool.org/2021/11/20/326/ 项目中clone看到的地址可能和真实的地址不同,所以我们可以修好这个地址。 Admin Area > Settings 的 General 中选择 Visibility and access controls。填写:Custom Git clone URL for HTTP(S)
1.4.初始化项目&启动
- 构建项目
修改完默认配置后,我们就可以初始化Gitlab的配置了。构建大概3~5分钟。并且后面我们每次修改默认配置文件后都需要执行这个命令。
已经投入生产的话,就不要在修改默认配置文件了,会影响线上了,也会将启动后修改的配置全部还原为默认
sudo gitlab-ctl reconfigure
- 重置密码
正常我们安装之后初始的密码会保存在 /etc/gitlab/initial_root_password文件中。
我们需要在24个小时之内登录到Gitlab上重置密码,否则这个文件就会自动被删除。
所有忘记密码的时候需要登录到服务器上重置密码。
登录到gitlab服务器
cd /var/opt/gitlab/
gitlab-rails console
--- 进入到Ruby的一个界面,输入production 进入控制台
production

user = User.where(id:1).first
user.password='xxxxxxxxx'
user.save!
1.5.基础命令
- gitlab-ctl start # 启动所有 gitlab 组件;
- gitlab-ctl stop # 停止所有 gitlab 组件;
- gitlab-ctl restart # 重启所有 gitlab 组件;
- gitlab-ctl status # 查看服务状态;
- gitlab-ctl reconfigure # 启动服务;(重新加载配置文件,在GitLab初次安装后可以使用,但是在业务环境中不可随意使用,reconfigure会把一些过去的config还原,导致修改的端口以及域名等都没有了。)
- gitlab-rake gitlab:check SANITIZE=true –trace # 检查gitlab;
- sudo gitlab-ctl tail # 查看日志;
1.6.修改配置【项目启动后】
1.6.1.修改域名
由于没有DNS服务器,无法进行域名解析,所以需要将域名修改为主机名,进入终端修改一下文件即可。
vim /opt/gitlab/embedded/service/gitlab-rails/config/gitlab.yml
## GitLab settings
gitlab:
  	## Web server settings (note: host is the FQDN, do not include http://)
host: 10.0.0.210
    port: 8888
    https: false
1.6.2.备份与恢复
- GitLab创建备份
gitlab-rake gitlab:backup:create
使用以上命令会默认在/var/opt/gitlab/backups目录下创建一个名称类似为1520580592_2018_03_09_10.5.3_gitlab_backup.tar的压缩包, 这个压缩包就是Gitlab整个的完整部分,其中开头的1520580592_2018_03_09_10.5.3是备份创建的日期。
- GitLab恢复
停止相关数据连接服务
gitlab-ctl stop unicorn
gitlab-ctl stop sidekiq
从1520580592_2018_03_09_10.5.3编号备份中恢复【人工选择】
gitlab-rake gitlab:backup:restore BACKUP=1520580592_2018_03_09_10.5.3
启动Gitlab
gitlab-ctl start
- Gitla b 修改备份文件默认目录
可以通过修改/etc/gitlab/gitlab.rb来修改默认存放备份文件的目录。
vim /etc/gitlab/gitlab.rb
gitlab_rails['backup_path'] = "/mnt/gitlab/backup">>修改文件路径即可
修改完成之后使用gitlab-ctl reconfigure命令重载配置文件即可。
注意:因为涉及到重新加载配置,reconfigure会把一些过去的config还原,导致修改的端口以及域名等都没有了。 建议在服务安装之后即修改仓库默认路径,若后期业务中修改此项,会对业务造成一定的影响。若后期业务需修改此项,请提前做好准备, 然后再修改配置文件中的相应参数。
重载配置文件之后会发现/mnt/gitlab/backup的权限发生变化
1.6.3.修改仓库的默认路径
- 修改配置文件,找到git_data_dirs
vim /etc/gitlab/gitlab.rb
# git_data_dirs({
# "default" => {
# "path" => "/mnt/nfs-01/git-data"
# }
# })
git_data_dir "/data/gitlab" >>此处添加自定义的仓库路径,目录需提前创建
在git_data_dir下面添加一句git_data_dir "/data/gitlab"
- 停止当前gitlab,重新加载配置
注意:仓库路径的修改会导致已有project的丢失,请提前进行备份,具体备份操作请参考上文"GitLab的备份与恢复",然后再修改配置文件中的相应参数。
gitlab-ctl stop
gitlab-ctl reconfigure
- 重新加载后,会发现在/data/gitlab目录下多出一个repositories目录
启动gitlab即可
gitlab-ctl start
1.6.4.GitLab服务端口修改
yum方式安装的GitLab的配置文件路径为/var/opt/gitlab/nginx/conf(其他安装方式的配置文件路径不一定相同,请自行查找)。
- 修改配置文件
vim /var/opt/gitlab/nginx/conf/gitlab-http.conf
###################################
## configuration ##
###################################
upstream gitlab-workhorse {
server unix:/var/opt/gitlab/gitlab-workhorse/socket;
}
server {
listen *:8888; >> 此处修改端口即可
- 重启服务
gitlab-ctl restart
1.6.5.设置发送邮件的功能
参考链接:http://www.fayfox.com/post/39.html
邮箱配置官方文档:https://docs.gitlab.com/omnibus/settings/smtp.html#mandrill
安装后的测试:https://blog.csdn.net/yelllowcong/article/details/79939589
如果测试不成功,请参照这篇文章:https://ruby-china.org/topics/20450(要将身份验证帐号和发件人保持一致。)
1.7.常见问题&注意事项
- Whoops, GitLab is taking too much time to respond 502:
https://blog.csdn.net/mqdxiaoxiao/article/details/104422826
- nginx 400 Bad Request Request Header Or Cookie Too Large:
https://blog.csdn.net/mqdxiaoxiao/article/details/104423995
1.8.docker安装
安装最新版本的 gitlab 社区版即可
docker run  -itd -p 9980:80  -p 9922:22 \
    -v /etc/gitlab:/etc/gitlab \
    -v /var/log/gitlab:/var/log/gitlab \
    -v /var/opt/gitlab:/var/opt/gitlab \
    --restart=no \
    --privileged=true \
    --name gitlab \
    gitlab/gitlab-ce
参数含义
- -i 以交互模式运行容器,通常与 -t 同时使用命令解释
- -t 为容器重新分配一个伪输入终端,通常与 -i 同时使用
- -d 后台运行容器,并返回容器ID
- -p 9980:80 将容器内80端口映射至宿主机9980端口,这是http访问端口
- -p 9922:22 将容器内22端口映射至宿主机9922端口,这是ssh访问的端口
- -v /home/gitlab/etc:/etc/gitlab 将容器/etc/gitlab目录挂载到宿主机/usr/local/gitlab-test/etc目录下,若宿主机内此目录不存在将会自动创建,其他两个挂载同这个一样
- –restart always 容器自启动
- –privileged=true 让容器获取宿主机root权限
- –name gitlab 设置容器名称为gitlab
- gitlab/gitlab-ce 镜像的名称,这里也可以写镜像ID
1. 安装完成后,需要查看初始密码:
docker exec -it gitlab grep 'Password:' /etc/gitlab/initial_root_password


2.修改http访问地址,使用管理员在管理界面修改即可。
修改的配置,参考普通的安装方式即可。
2.使用
2.1.管理功能
第一:注册新用户
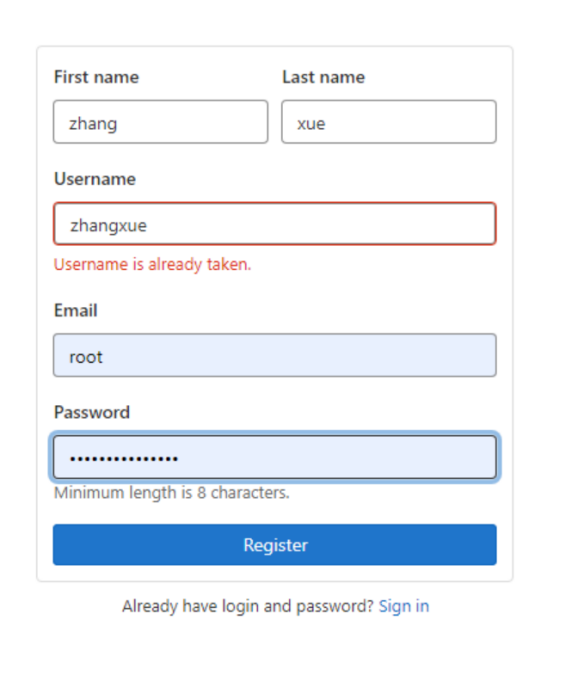
需要root管理员审批,才能正常使用
第二:管理员审批
管理员登录,进入账号
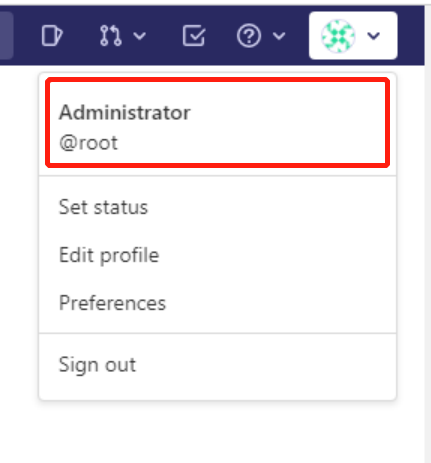
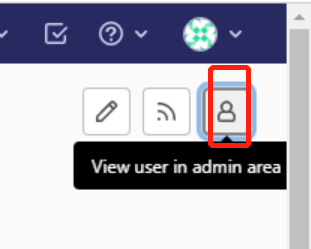
选择管理控制台
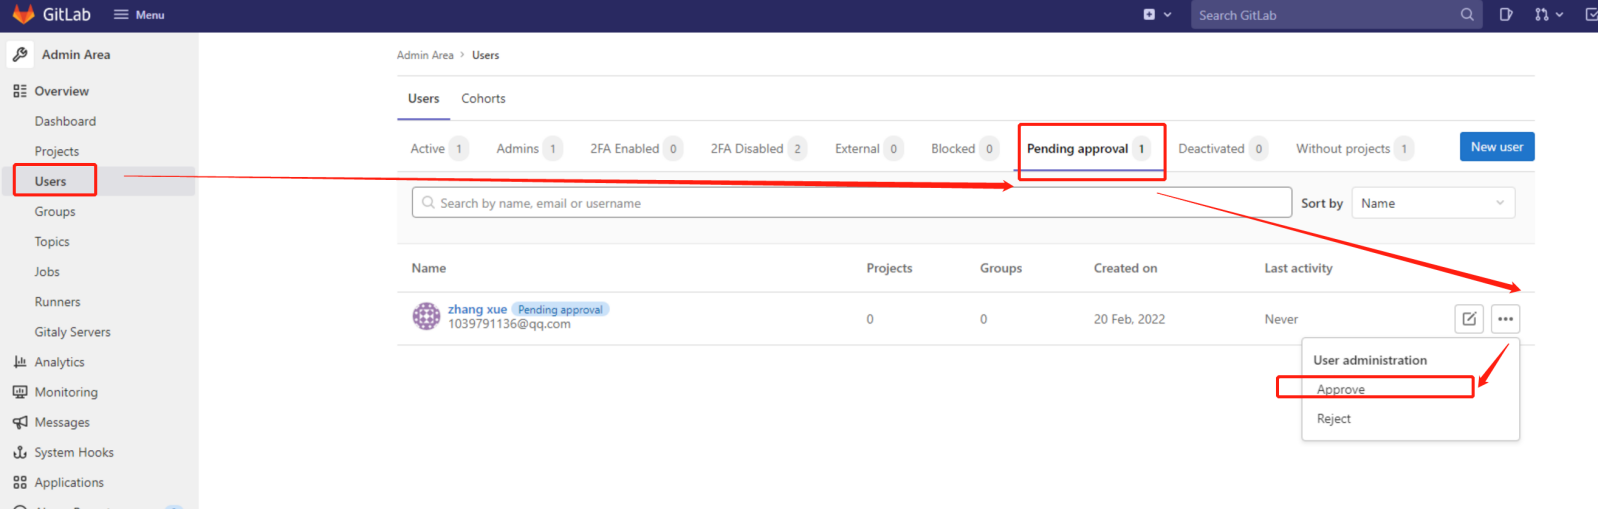
找到申请,统一或者拒绝就行
2.2.开启导入外部仓库
Gitlab想要导入外部系统的仓库需要单独配置。只能管理员操作。 操作的地址:admin area > general > Visibility and access controls 就可以看到Import sources。都选选项即可。
参考:https://docs.gitlab.cn/jh/user/project/import/gitee_ui.html
2.3.辅助文件
项目中添加必要的文件,起到辅助项目管理的作用。
- README.md。项目的说明文档,可以写项目的介绍、简述使用案例等,如果内容非常多的话,可以使用Gitlab的wiki功能
- .gitlab-ci.yml。pipeline配置文件。说明文档
- LICENSE。开源协议文件。
- CHANGELOG。每次版本的修改内容
2.4.自动tag与发布release
3.CI/CD
3.1.gitlab-runner
- gitlab-runner安装到什么地方:并不是gitlab的服务器上,而是我们需要执行ci/cd命令的地方。
可以是用户自己的服务器,docker以及k8s等。
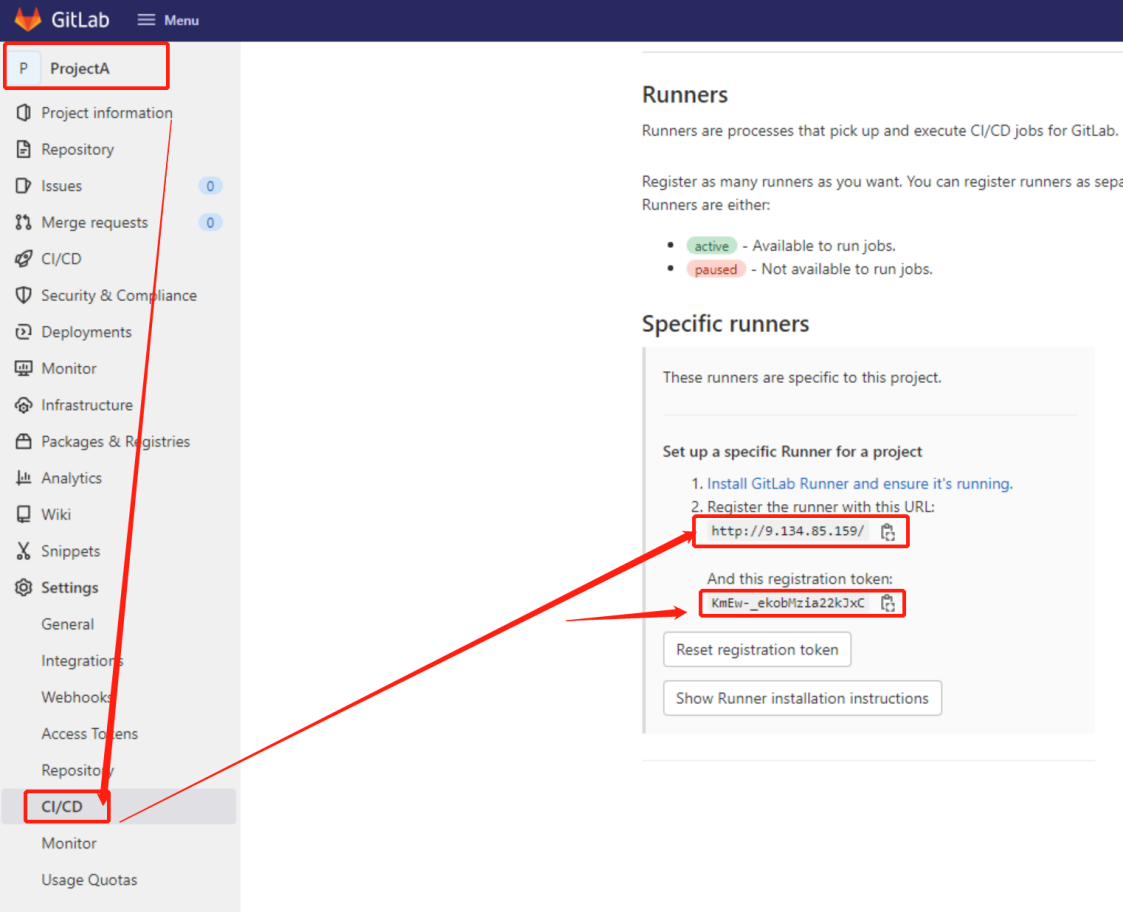
3.1.1.获得token和url
每个项目都有自己的token。我们也可以吧项目的runner共享给别的项目
3.1.2.安装gitlab-runner
参考官网: https://docs.gitlab.com/14.7/runner/install/linux-repository.html
- 下面的是直接使用官方的安装程序安装:
下载
curl -L "https://packages.gitlab.com/install/repositories/runner/gitlab-runner/script.rpm.sh" | sudo bash
安装runner
sudo yum install gitlab-runner
- 如果上面安装失败,可以直接下载安装包安装
https://docs.gitlab.com/14.7/runner/install/linux-manually.html#using-binary-file
下载安装包
sudo curl -L --output /usr/local/bin/gitlab-runner
"https://gitlab-runner-downloads.s3.amazonaws.com/latest/binaries/gitlab-runner-linux-amd64"
授予它执行权限:
sudo chmod +x /usr/local/bin/gitlab-runner
创建 GitLab CI 用户:
sudo useradd --comment 'GitLab Runner' --create-home gitlab-runner --shell /bin/bash
安装并作为服务运行:
sudo gitlab-runner install --user=gitlab-runner --working-directory=/home/gitlab-runner
sudo gitlab-runner start
3.1.3.注册runner
输入命令后,会提示输入很多参数
gitlab-runner register
Please enter the gitlab-ci coordinator URL (e.g. https://gitlab.com )

# 输入我们需要注入的URL
Please enter the gitlab-ci token for this runner

# 输入我们千辛万苦找到的 token
Please enter the gitlab-ci description for this runner

#写点介绍
Please enter the gitlab-ci tags for this runner (comma separated):

# mavenBuild,jarRunner
# tag 就是这个 gitlab-runner 的名字,之后可以根据不同的 tag 给不同的
gitlab-runner 指派任务

Please enter the executor: ssh, docker+machine, docker-ssh+machine,
kubernetes, docker, parallels, virtualbox, docker-ssh, shell:

# shell 个人比较推荐 shell,因为即使选用了 shell
也可以调用其他的运行环境比如 docker
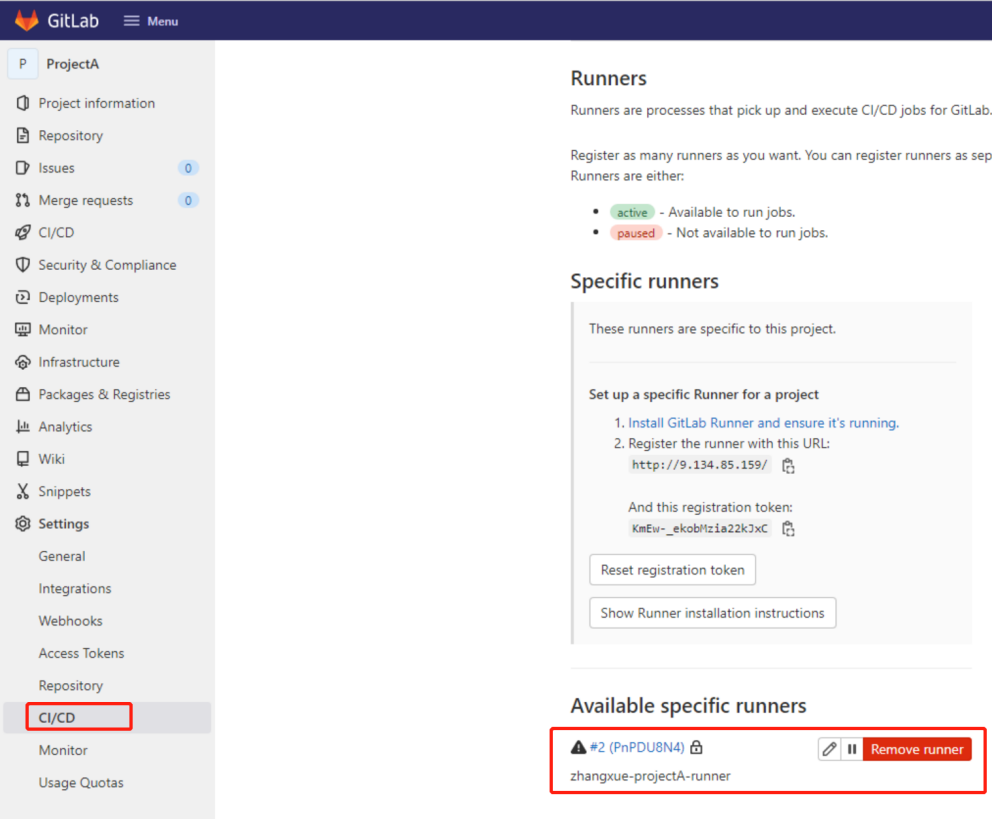
3.1.4.查看&编辑runner
3.1.5.用户权限
在执行流水线的时候默认的用户是gitlab-runner,而这个用户的权限很低。
导致一些mv、npm、ln等常用shell执行都会报permission不够的提示信息,所以要提升用户的权限。有两种解决方案
- 方案一 将gitlab-runner加入root用户组
usermod -g root gitlab-runner - 方案二 配置 /etc/sudoers 找到 `root ALL=(ALL) ALL` // 一般在第100行,在下面写入不同用户,同样的配置,如下
\`gitlab-runner ALL=(ALL) ALL\` // 记住它们之间有空格sudoers这个文件一般只读,需要加wq!才可以保存成功
3.1.6.基本命令
- 启动命令
gitlab-runner --debug <command> #调试模式排查错误特别有用。 gitlab-runner <command> --help #获取帮助信息 gitlab-runner run #普通用户模式 配置文件位置~/.gitlab-runner/config.toml sudo gitlab-runner run # 超级用户模式配置文件位置/etc/gitlab-runner/config.toml - 注册命令
gitlab-runner register #默认交互模式下使用,非交互模式添加 --non-interactive gitlab-runner list #此命令列出了保存在配置文件中的所有运行程序 gitlab-runner verify #此命令检查注册的runner是否可以连接,但不验证GitLab服务是否正在使用runner。 --delete 删除 gitlab-runner unregister #该命令使用GitLab取消已注册的runner。 #使用令牌注销 gitlab-runner unregister --url http://gitlab.example.com/ --token t0k3n #使用名称注销(同名删除第一个) gitlab-runner unregister --name test-runner #注销所有 gitlab-runner unregister --all-runners - 服务管理
gitlab-runner install --user=gitlab-runner --working-directory=/home/gitlab-runner

#user指定将用于执行构建的用户
#working-directory 指定将使用 Shell executor运行构建时所有数据将存储在其中的根目录

gitlab-runner uninstall #该命令停止运行并从服务中卸载GitLab Runner。
gitlab-runner start #该命令启动GitLab Runner服务。
gitlab-runner stop #该命令停止GitLab Runner服务。
gitlab-runner restart #该命令将停止,然后启动GitLab Runner服务。
gitlab-runner status #此命令显示GitLab Runner服务的状态。当服务正在运行时,退出代码为零;而当服务未运行时,退出代码为非零。
3.2.配置.gitlab-ci.yml
- 中文博客教程:https://www.cnblogs.com/sanduzxcvbnm/p/13891757.html
- 官方文档教程:https://www.cnblogs.com/sanduzxcvbnm/category/1871807.html
3.2.1.流水线语法
| Keyword | Description |
|---|---|
| script | 运行的Shell命令或脚本。 |
| image | 使用docker映像. |
| services | 使用docker服务映像. |
| before_script | 在每个阶段作业运行前运行脚本。 |
| after_script | 在每个阶段作业运行后运行脚本。 |
| stages | 定义管道中的阶段,运行顺序。 |
| stage | 为工作定义一个阶段,可选,未指定默认为test阶段。 |
| only | 限制创建作业的时间. |
| except | 限制未创建作业的时间. |
| rules | 条件列表,用于评估和确定作业的选定属性,以及是否创建该作业. |
| allow_failure | 允许作业失败. 失败的工作不会影响提交状态. |
| when | 什么时候开始工作 |
| environment | 作业部署到的环境的名称. |
| cache | 在后续运行之间应缓存的文件列表. |
| artifacts | 成功时附加到作业的文件和目录列表. |
| dependencies | 通过提供要从中获取工件的作业列表,限制将哪些工件传递给特定作业. |
| coverage | 给定作业的代码覆盖率设置. |
| retry | 发生故障时可以自动重试作业的时间和次数。 |
| timeout | 定义自定义作业级别的超时,该超时优先于项目范围的设置。 |
| parallel | 多少个作业实例应并行运行. |
| trigger | 定义下游管道触发器. |
| include | 允许此作业包括外部YAML文件. |
| extends | 该作业将要继承的配置条目. |
| pages | 上载作业结果以用于GitLab页面. |
| variables | 在作业级别上定义作业变量. |
| interruptible | 定义在通过新的运行使其冗余时是否可以取消作业. |
| resource_group | 限制作业并发. |
3.2.2.简单案例
需要编写.gitlab-ci.yml文件。一般放在项目的跟目录下【下面是个最简单的】
# 在任一阶段开始之前执行 echo "ci&cd要开始了啊~~~~~"
before_script:
  - echo "ci&cd要开始了啊~~~~~"

# 说明有哪些阶段
stages:
  - build
  - test
  - deploy

# build 阶段
build-job:
  stage: build
  script:
    - echo "build begin"
    - sleep 5
    - echo "build end"
  tags:
    - builder

# test 阶段
unit-test-job:
  stage: test
  script:
    - echo "test begin"
    - sleep 2
- echo "test end"

# test 阶段的第二个任务
unit2-test-job:
  stage: test
  script:
    - echo "test2 begin"
    - sleep 2
    - echo "test2 end"

# 部署 阶段
deploy-job:
  stage: deploy
  script:
    - echo "deploy begin"
    - sleep 5
    - echo "deploy end"
  tags:
    - builder
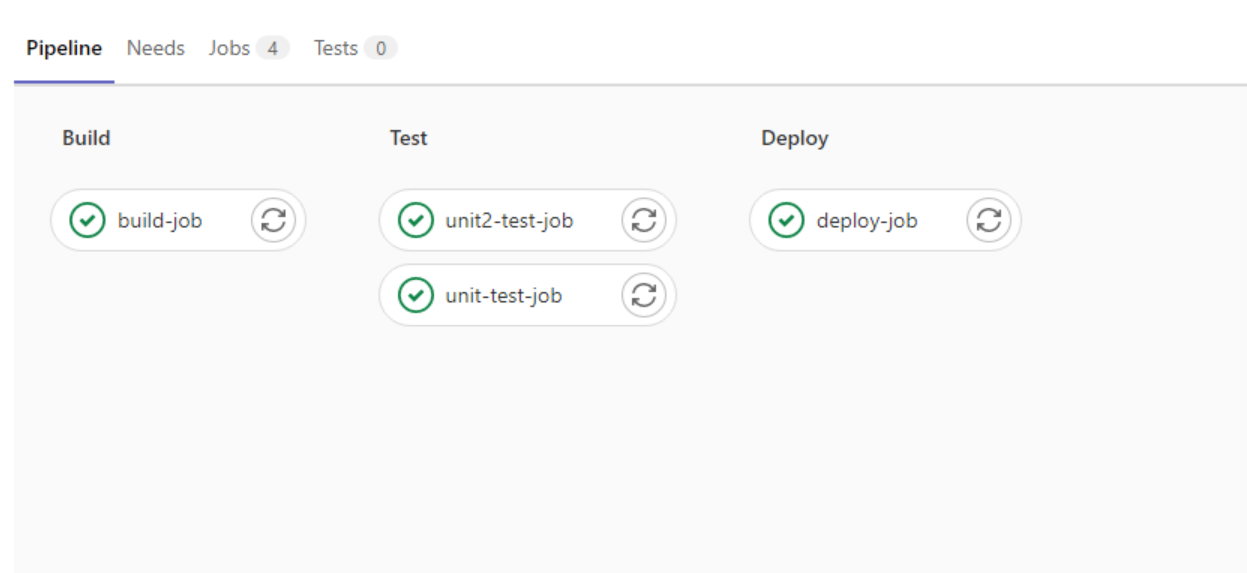
效果如下
3.2.3.Run pipeline

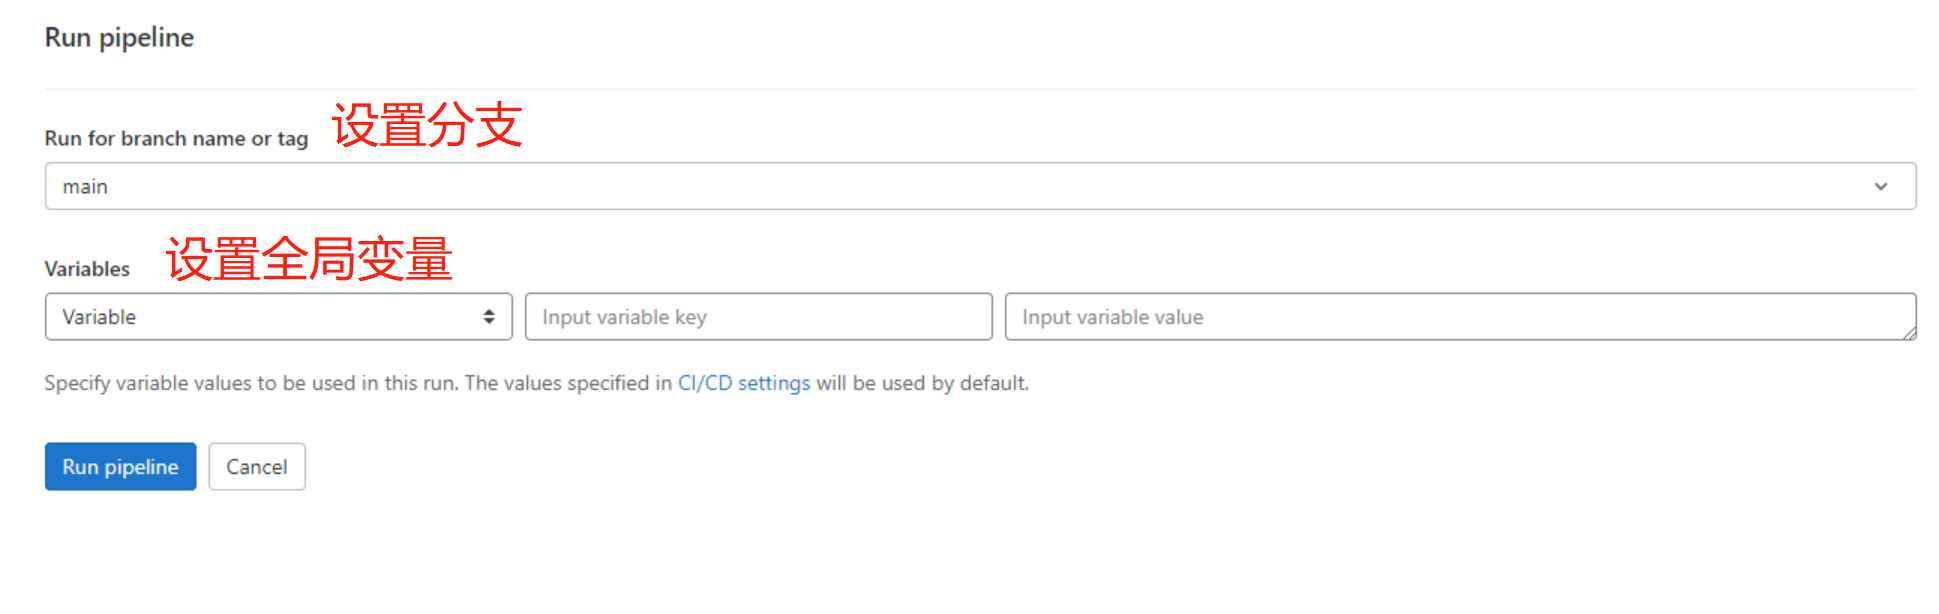
流水线如下。可以看到各个阶段的允许结果
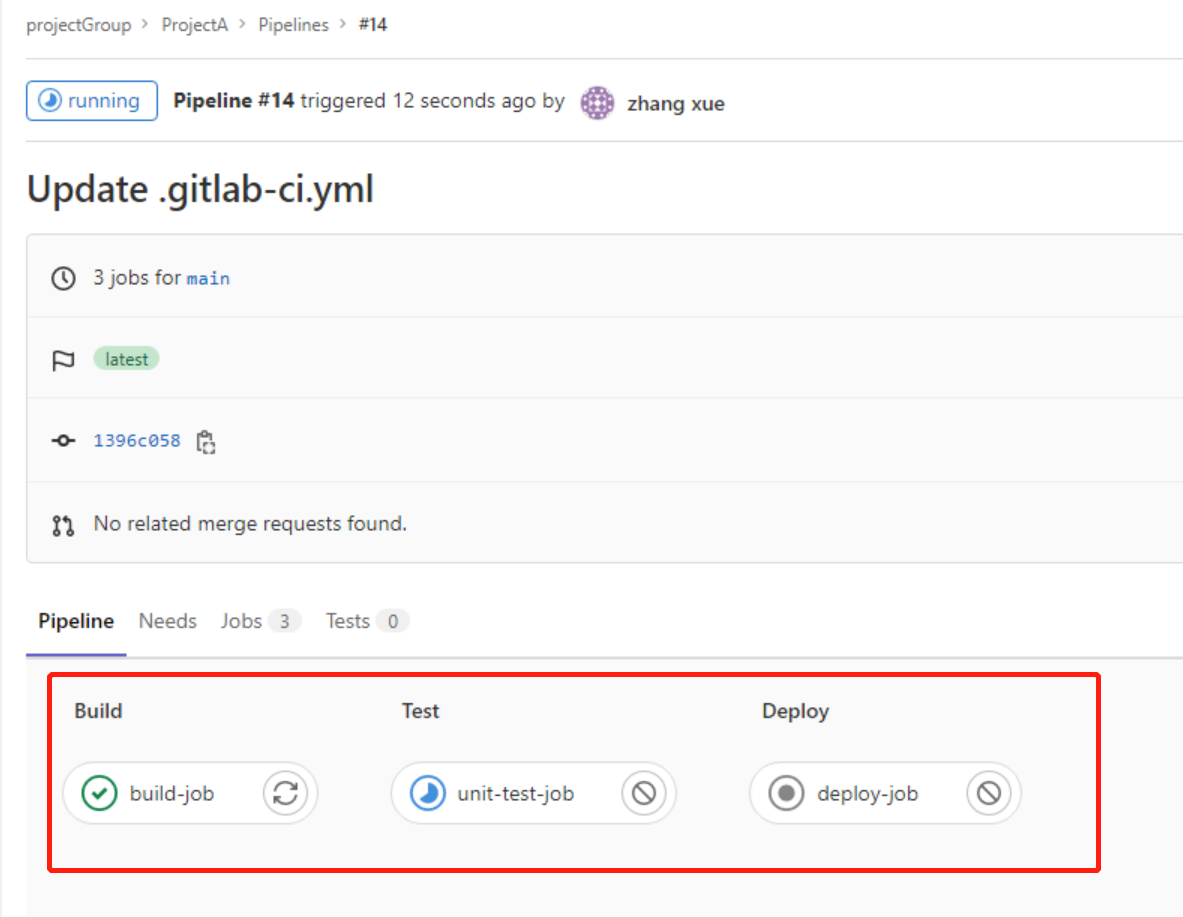
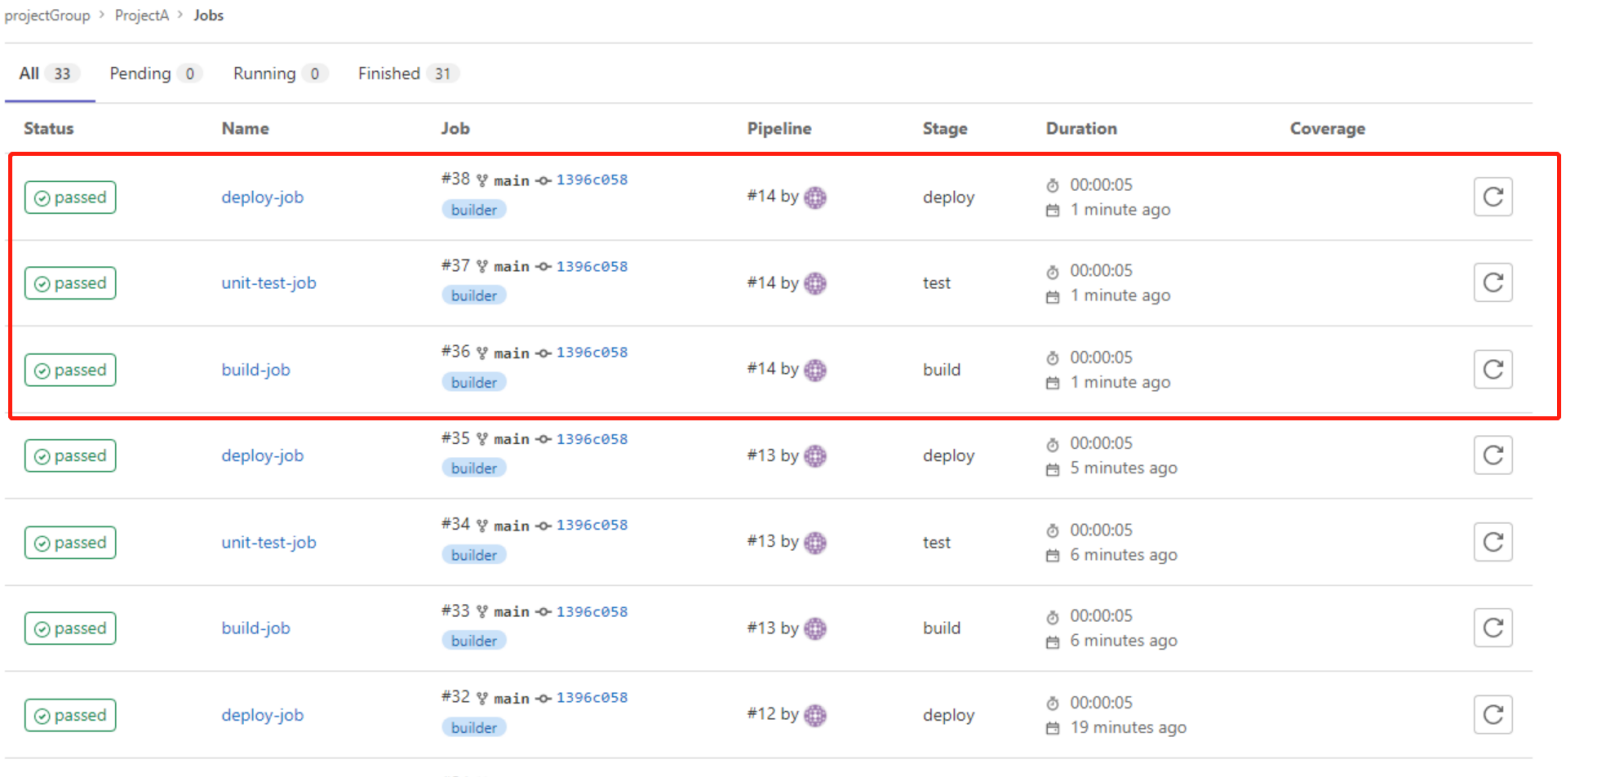
我们可以看到每个run pipeline的时候,每个阶段都是一个job。
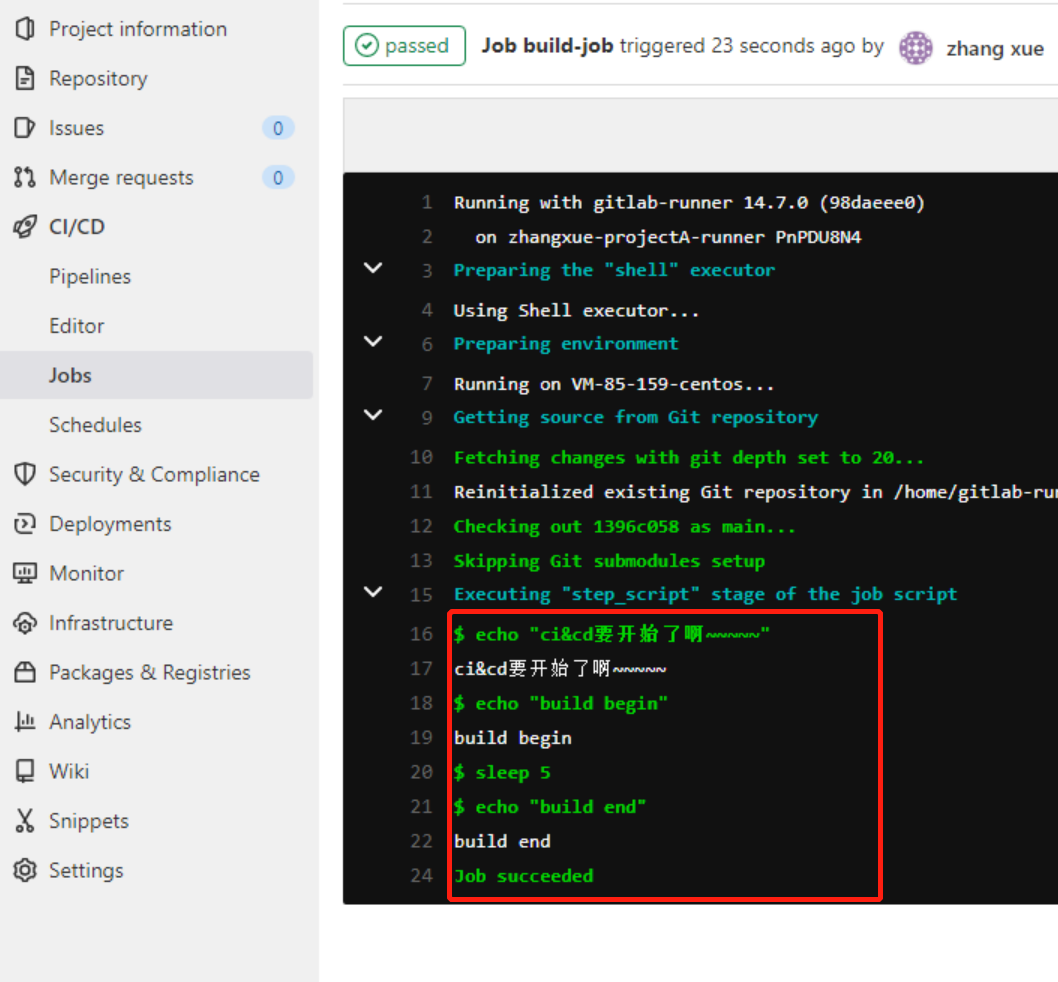
点击每个job,都会看到详细的日志
3.3.案例
3.3.1.Sonar 质量监控
案例:其他项目替换projectKey,和login的token即可。扫描通过与否,可以在各个项目的配置中进行调整
before_script:
##设置环境变量
  - export PATH=$PATH

## 定义有哪些stages
stages:
  - sonarcheck
  - build
  - test
  - deploy

sonarcheck:
  except:
    - schedules
  ### 指定只在PR、master和创建tag的时候运行
  only:
    - merge_requests
    - master
    - tags
  stage: analysis
  script:
   - source ~/.bashrc
   - export PATH=/home/uniubi/software/sonar-scanner-4.6.0.2311-linux/bin:$PATH ### sonar-scanner的路径
   - sonar-scanner -Dsonar.projectKey=demo -Dsonar.sources=. -Dsonar.host.url=http://XXX:9000 -Dsonar.login=b7db4dc570ab507c272557c2d0cec6487dbcc8a9 -Dsonar.gitlab.commit_sha=$CI_BUILD_REF -Dsonar.gitlab.ref_name=$CI_BUILD_REF_NAME -Dsonar.gitlab.project_id=$CI_PROJECT_PATH -Dsonar.language=c++ -Dsonar.sourceEncoding=UTF-8 -Dsonar.gitlab.max_blocker_issues_gate=-1 -Dsonar.gitlab.max_critical_issues_gate=-1 -Dsonar.gitlab.query_max_retry=50 -Dsonar.gitlab.query_wait=1000
  ###允许失败,可根据自己项目需要设置
  allow_failure: true
  ###对应gitlab-runner的tags
  tags:
    - sonar
3.3.2.spring boot直接部署
打包成jar包,复制到指定目录,设置日志目录,启动jar
# 说明有哪些阶段
stages:          # List of stages for jobs, and their order of execution
  - build
  - test
  - deploy

# build 阶段
build-job:
  stage: build
  script:
    - echo "build begin"
    - mvn clean package -Dmaven.test.skip=true
    - cp ./target/demo-0.0.1-SNAPSHOT.jar /search/odin/demo.jar
    - cp ./restart.sh /search/odin/restart.sh
    - echo "build end"
  tags:
    - builder


# test 阶段
unit-test-job:
  stage: test
  script:
    - echo "test begin"
    - sleep 5
    - echo "test end"
  tags:
    - builder

# 部署 阶段
deploy-job:
  stage: deploy
  script:
    - echo "deploy begin"
    - bash /search/odin/restart.sh demo
    - echo "deploy end"
  tags:
    - builder
配合重启的脚本完成启动
# restart.sh
#!/bin/bash
if [ $# -ne 1 ]
then
        echo "arguments error!"
        exit 1
else
        jarname=$1
        echo $jarname
        pid=`ps -ef | grep "$jarname.jar"|grep -v grep|awk '{print $2}'`
        for id in $pid
        do
                echo $id
                kill -9 $id
                echo "killed $id"
        done
        nohup java -jar /search/odin/$jarname.jar > /search/odin/$jarname-log.log 2>&1 &
fi
3.3.3.spring boot docker部署
stages:
  - test
  - docker
  - publish

## roc-config-center 单元测试!!!!!!!!
#test:
#  stage: test
#  script:
#    - echo "start test $CI_COMMIT_SHA"
#    - gradle test -d
    # 代码覆盖率
#    - gradle jacocoTestReport
    #- gradle sonarqube
#    - echo "end sonar"
#  tags:
#    - testsvr-run

# 生成镜像
# 测试
testDocker:
  stage: docker
  script:
    # tag version!!
    - tag_version=test-`expr $CI_PIPELINE_ID % 10`
    # gen tagName
    - tag_name=docker-reg.zhangxue.com/roc-ci/roc-tco-portal:$tag_version
    - echo "------------- start test deploy ------------- "
    - gradle build -x test
    - echo "build success"
    - docker build -t $tag_name .
    - echo "docker success"
    - ls ./build/libs/*.jar
    - docker push $tag_name
    - echo "------------- end test deploy ------------- "
  tags:
    - testsvr-run
  only:
    - test

# 预生产和线上
prdDocker:
  stage: docker
  script:
    # gen tagName
    - tag_name=docker-reg.zhangxue.com/roc-ci/roc-tco-portal:1.0.$CI_PIPELINE_ID
    # gen tagName
    - echo "start package"
    - echo `pwd`
    - gradle build -x test
    - echo "build success"
    - docker build -t $tag_name .
    - echo "docker success"
    - ls ./build/libs/*.jar
    #    - docker tag roc-tco_portal `$tag_name`
    - docker push $tag_name
  tags:
    - testsvr-run
  only:
    - dev
  when: manual

# 发布
# 测试
testPublish:
  stage: publish
  script:
    # tag version
    - tag_version=test-`expr $CI_PIPELINE_ID % 10`
    # gen tagName
    - tag_name=docker-reg.zhangxue.com/roc-ci/roc-tco-portal:$tag_version
    - echo "start publish"
    - echo `pwd`
    - echo "============start k8s gen============"
    - echo "imagePath=$tag_name" >env.properties
    - chmod u+x convert
    - ./convert test
    - echo "============end k8s gen============"
    - kubectl apply -f k8s-final.yaml -n ted-opd --kubeconfig ~/k8scert/ted
    - echo "publish end"
  tags:
    - testsvr-run
  only:
    - test

# 预生产
prePublish:
  stage: publish
  script:
    # gen tagName
    - tag_name=docker-reg.zhangxue.com/roc-ci/roc-tco-portal:1.0.$CI_PIPELINE_ID
    # gen tagName
    - echo "start publish"
    - echo "============start k8s gen============"
    - echo `pwd`
    - echo "imagePath=$tag_name" >env.properties
    - chmod u+x convert
    - ./convert pre
    - echo "============end k8s gen============"
    - kubectl apply -f k8s-final.yaml -n ted-opd --kubeconfig ~/k8scert/ted
    - echo "publish end"
  tags:
    - testsvr-run
  only:
    - dev
  when: manual

# 生产
prdPublish:
  stage: publish
  script:
    # gen tagName
    - tag_name=docker-reg.zhangxue.com/roc-ci/roc-tco-portal:1.0.$CI_PIPELINE_ID
    # gen tagName
    - echo "start publish"
    - echo "============start k8s gen============"
    - echo `pwd`
    - echo "imagePath=$tag_name" >env.properties
    - chmod u+x convert
    - ./convert prd
    - echo "============end k8s gen============"
    - kubectl apply -f k8s-final.yaml -n ted-opd --kubeconfig ~/k8scert/ted
    - echo "publish end"
  tags:
    - testsvr-run
  only:
    - dev
  when: manual
4.高可用方案
Gitlab-ce是不支持分布式架构方案的。为了保证高可用,我们只能借助其他技术实现高可用
方案1:DRBD。为整个Gitlab的服务器进行镜像
DRBD是一个用软件实现的、无共享的、服务器之间镜像块设备内容的存储复制解决方案
教程:https://www.cnblogs.com/wangshuyang/p/10946099.html
然后让镜像的服务器作为热备即可
官网的一个方案:https://wxaxiaoyao.cn/article/67
- 本文作者:zhangxue
- 本文链接:https://lucksnow1989.github.io/article/10.devOps/3.GitLab.html
- 版权声明:本文为本人原创文章,遵循 CC 4.0 BY-NC-SA版权协议,转载请附上原文出处链接和本声明。